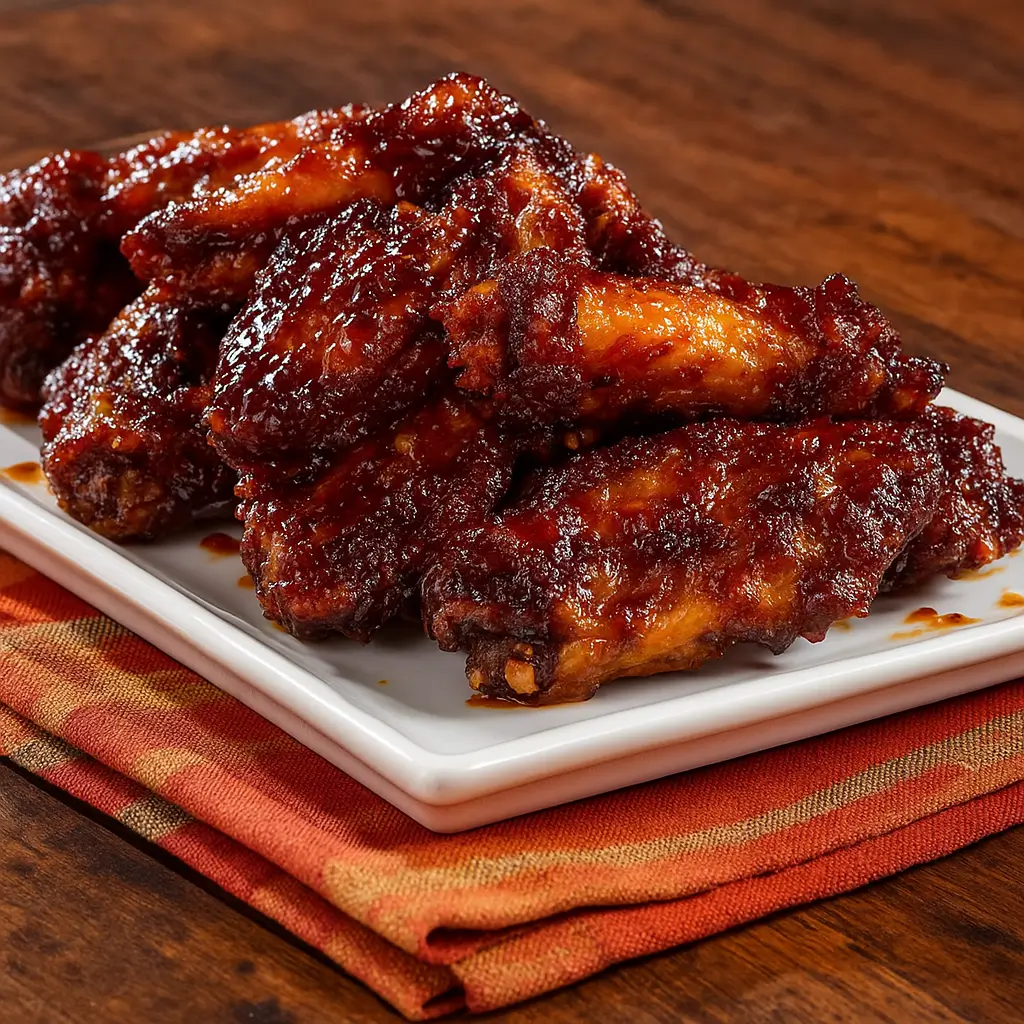
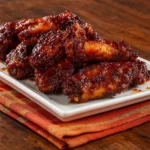
Honey glazed chicken wings are one of those feel-good comfort foods that somehow manage to hit every craving at once. They’re sweet, savory, just a little spicy, and ridiculously satisfying. Whether you’re throwing together a quick weeknight dinner, hosting a game night, or just craving something sticky-finger delicious, these wings are your new best friend.
The honey glaze caramelizes beautifully in the oven, giving you that gorgeous, golden-brown finish with just the right amount of char. Oh, and bonus? You don’t need a fryer or any fancy ingredients to make them happen. We’re talking pantry staples and simple steps. Toss, bake, glaze, bake again. Done and delicious.
Table of Contents
What is Honey Glazed Chicken Wings?
Honey glazed chicken wings are baked or roasted chicken wings coated in a rich, sticky glaze made with honey, brown sugar, soy sauce, and a few flavor-boosting extras. The magic really happens in the oven when the glaze caramelizes, clinging to every nook and cranny of the crispy wings. Think BBQ vibes with a glossy, sweet twist.
These wings are typically baked (not fried), making them easier on cleanup and just a bit lighter without sacrificing that crispy skin we all love. They’re finger-lickin’ good, versatile enough to serve as an appetizer or main dish, and perfect for those nights when you want big flavor without a ton of effort.
Reasons to Try Honey Glazed Chicken Wings
First off, let’s be honest—honey glazed chicken wings are downright addictive. But besides that obvious truth, here are a few reasons you’ll want to keep this recipe on repeat: They’re super simple. With just a few pantry staples, you can pull off a restaurant-worthy dish in under an hour.
They’re also incredibly versatile—perfect for weeknight dinners, game day gatherings, or even potlucks. And if you’ve got picky eaters in the house? The sweet and savory combo usually wins them over. Plus, unlike fried wings, these are baked, so they’re a little easier on your conscience (and your stovetop). And the sticky glaze? It’s like edible gold.
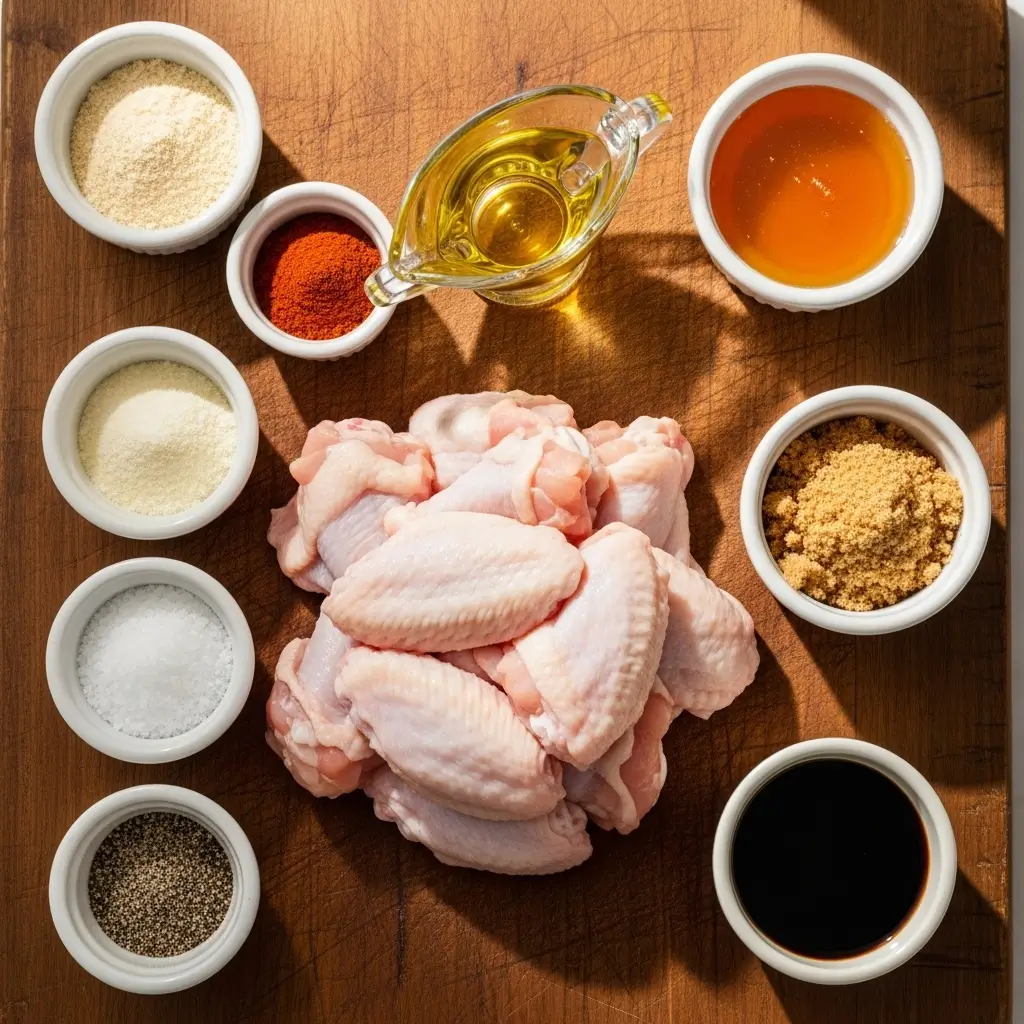
Ingredients Needed to Make Honey Glazed Chicken Wings
- 2 pounds chicken wings (separated into drumettes and flats)
- 1 tablespoon vegetable oil
- 1 teaspoon garlic powder
- 1 teaspoon onion powder
- 1 teaspoon smoked paprika
- 1/2 teaspoon black pepper
- 1/2 teaspoon salt
For the Glaze:
- 1/2 cup honey
- 1/4 cup brown sugar, packed
- 1/4 cup soy sauce
- 1 teaspoon rice vinegar
- Pinch of red pepper flakes
- Dried parsley (optional, for garnish)
Instructions to Make Honey Glazed Chicken Wings
Making honey glazed chicken wings at home doesn’t need to be complicated. Follow this detailed step by step guide to get perfectly crispy, sticky, and mouthwatering wings without any frying. Whether you’re new to cooking or just want a foolproof method, this guide has you covered from start to saucy finish.
Step 1: Pat the Chicken Wings Dry (Yes, This Part Matters)
The first step to crispy baked wings starts before they hit the oven. Use paper towels to pat each chicken wing completely dry. Moisture is the enemy of crispy skin, and this step by step drying process is key for that golden crunch. If you’re prepping ahead, let them rest uncovered in the fridge for a couple of hours to air dry further.
Need help choosing the right cut? Check out our tips on how to prep chicken like a pro — it includes advice on flats vs. drumettes and why they matter.
Step 2: Season the Wings with a Flavorful Dry Rub
In a small bowl, mix 1 tablespoon of vegetable oil with 1 teaspoon each of garlic powder, onion powder, and smoked paprika, plus ½ teaspoon of salt and black pepper. This spice blend adds savory depth without overpowering the sweet glaze later. Pour the mixture over the dried wings and toss until every piece is coated evenly. Don’t skip the oil—it helps the spices stick and aids in crisping.
Want to switch it up? Try adding cayenne or a dash of chili powder for a smoky-spicy variation. For more creative swaps, check out our post on simple seasoning ideas.
Step 3: Arrange the Wings for Even Cooking
Line a baking sheet with foil (easy cleanup, trust us), and set a wire rack on top. Arrange the wings in a single layer with a bit of space between them. This step by step layout allows heat to circulate all around each wing, so they roast instead of steam. The rack is your best friend for getting that coveted crispiness without deep frying.
Step 4: Bake the Wings to Crispy Perfection
Preheat your oven to 400°F (200°C). Bake the wings for 40–45 minutes, flipping them halfway through. This turning step by step ensures even browning on both sides. You’ll know they’re ready when the skin is golden, slightly blistered, and smells like magic.
Tip: Want to meal-prep? These wings bake beautifully and can be glazed just before reheating. For a full meal prep pairing, try them with our chicken sausage and broccoli orzo.
Step 5: Prepare the Sweet and Savory Honey Glaze
While the wings bake, make your glaze. In a small saucepan, combine ½ cup honey, ¼ cup packed brown sugar, ¼ cup soy sauce, 1 teaspoon rice vinegar, and a pinch of red pepper flakes. Simmer over medium heat, stirring often, until the sugar dissolves and the mixture slightly thickens (about 2–3 minutes). Set aside but keep it warm—it’ll pour better and coat more evenly.
Looking for a lower-sugar option? We’ve got smart swap suggestions in our guide to healthy chicken sauces.
Step 6: Toss the Baked Wings in the Glaze
Once the wings are out of the oven, transfer them to a clean bowl. Pour the warm glaze over the wings and gently toss until fully coated. This step by step toss is where the flavor magic happens—every wing should be shiny, sticky, and shimmering with that sweet glaze.
Use tongs or a spatula to gently flip and coat them, especially if they’re still hot. And no, licking the spoon isn’t required, but highly encouraged.
Step 7: Return to the Oven to Set the Glaze
Place the glazed wings back on the wire rack and return them to the oven for 10–15 more minutes. This final bake lets the glaze bubble, caramelize, and form that signature sticky coating. Want them extra charred? Broil for the last 2–3 minutes—but keep your eyes on them. Glaze goes from gorgeous to scorched real quick.
This step by step broil finish gives you that glossy, finger-licking shine that rivals any wing joint.
Step 8: Garnish and Serve Immediately
Remove the wings from the oven and let them rest for 2–3 minutes. Sprinkle with dried parsley or chopped green onions if you want to get fancy. Serve hot and fresh with lots of napkins—these wings are gloriously messy in the best way.
Looking for a side dish to balance out the sticky sweetness? Pair with honey pepper chicken mac and cheese or a crisp cabbage slaw for a bit of crunch.
What to Serve with Honey Glazed Chicken Wings
These wings pair beautifully with both casual sides and heartier mains. If you’re keeping it classic, go with crispy fries or coleslaw. Looking for a lighter vibe? A simple green salad with a tangy vinaigrette cuts the sweetness of the glaze. Want to bulk it up into a full dinner? Serve over jasmine rice or alongside roasted veggies. For an easy dinner night, pair it with this chicken sausage and broccoli orzo or something indulgent like honey pepper chicken mac and cheese. Either way, don’t forget a cold drink—these wings bring a little heat.
Key Tips for Making Honey Glazed Chicken Wings
Here’s how to make sure your honey glazed chicken wings are next-level every single time. First, pat your wings dry—yes, again. Dry wings = crispy skin. Second, don’t skip the wire rack; it helps air circulate and gives you an evenly roasted result. When making the glaze, don’t boil it too long or it’ll turn into candy (been there, done that). Flip those wings halfway through baking for color on both sides. And finally, broil with care. A minute too long and you’ll go from sticky caramelized to full-blown charcoal. Keep your eyes on the prize!
Storage and Reheating Tips for Honey Glazed Chicken Wings
Got leftovers? Lucky you. Store cooled wings in an airtight container in the fridge for up to 3 days. For best results, reheat in the oven at 375°F for 10–12 minutes—this helps bring back some crispiness without drying them out. Microwave works too, but be ready for sticky fingers and softer skin. Want to freeze them? Totally doable. Freeze the baked, unglazed wings, then glaze and bake again when ready to serve. Just don’t freeze them once glazed—they’ll lose their texture and charm. And no one wants soggy sweet chicken, right?
FAQs
Can I use frozen wings?
Sure—just thaw them completely and pat dry before seasoning.
Can I make this in the air fryer?
Absolutely. Cook wings at 380°F for 25 minutes, shaking halfway through. Glaze and air fry again for 5 minutes.
Is the glaze spicy?
Only mildly, thanks to the red pepper flakes. Feel free to adjust to taste.
What can I use instead of soy sauce?
Try coconut aminos or tamari for a gluten-free version.
Can I prep the wings ahead?
Yes! Bake and store, then glaze and reheat just before serving.
Final Thoughts
Honey glazed chicken wings are that perfect mix of easy, indulgent, and crowd-pleasing. Whether you’re serving them up for a cozy dinner, party platter, or just because it’s Tuesday, these wings deliver serious flavor with very little fuss. And if you’re looking to add a little variety to your chicken lineup, check out other tasty ideas like coconut lime chicken and rice or this sweet-and-savory cowboy chicken bites. Once you try these honey glazed beauties, don’t be surprised if they end up in your weekly rotation—no judgment here, friend.
Visit our Pinterest for regular slow cooker recipe updates, or join our Facebook discussions where cooking fans exchange their favorite hearty meal ideas.
PrintHoney Glazed Chicken Wings – Crispy, Sticky, and Easy to Make
These honey glazed chicken wings are oven-baked to crispy perfection, then coated in a sticky-sweet glaze with hints of garlic, soy, and a touch of heat. A perfect balance of flavor and texture for any main dish or party platter.
- Prep Time: 15 minutes
- Cook Time: 1 hour
- Total Time: 1 hour
- Yield: 4 servings
- Category: Main Course
- Method: Baking
- Cuisine: American
Ingredients
- About 2 pounds chicken wings, separated into drumettes and flats
- 1 tablespoon vegetable oil
- 1 teaspoon garlic powder
- 1 teaspoon onion powder
- 1 teaspoon smoked paprika
- 1/2 teaspoon black pepper
- 1/2 teaspoon salt
- For the Glaze:
- 1/2 cup honey
- 1/4 cup brown sugar, packed
- 1/4 cup soy sauce
- 1 teaspoon rice vinegar
- Pinch of red pepper flakes
- Dried parsley for garnish
Instructions
1. Pat the chicken wings very dry with paper towels to remove surface moisture. Place wings in a large bowl.
2. In a small bowl, mix vegetable oil, garlic powder, onion powder, smoked paprika, black pepper, and salt.
3. Pour the seasoning mixture over the wings and toss to coat evenly.
4. Place wings in a single layer on a wire rack set over a baking sheet, allowing air circulation for crispiness.
5. Preheat oven to 400°F (200°C). Bake wings for 40–45 minutes, flipping halfway through, until golden and starting to crisp.
6. While wings bake, prepare the glaze: In a saucepan, combine honey, brown sugar, soy sauce, rice vinegar, and red pepper flakes. Simmer for 2–3 minutes until slightly thickened. Remove from heat.
7. Transfer baked wings to a clean bowl. Pour warm glaze over wings and toss gently until fully coated.
8. Return glazed wings to the wire rack and bake for another 10–15 minutes until sticky and caramelized.
9. For extra char and crispiness, broil wings for 2–3 minutes, watching carefully.
10. Remove from oven, garnish with dried parsley, and serve immediately.
Notes
For extra crispiness and char, broil for the last 2–3 minutes of baking, but watch carefully to prevent burning.
Patting wings dry before seasoning is essential for crispy skin.
Use a wire rack over a baking sheet for even cooking and air circulation.