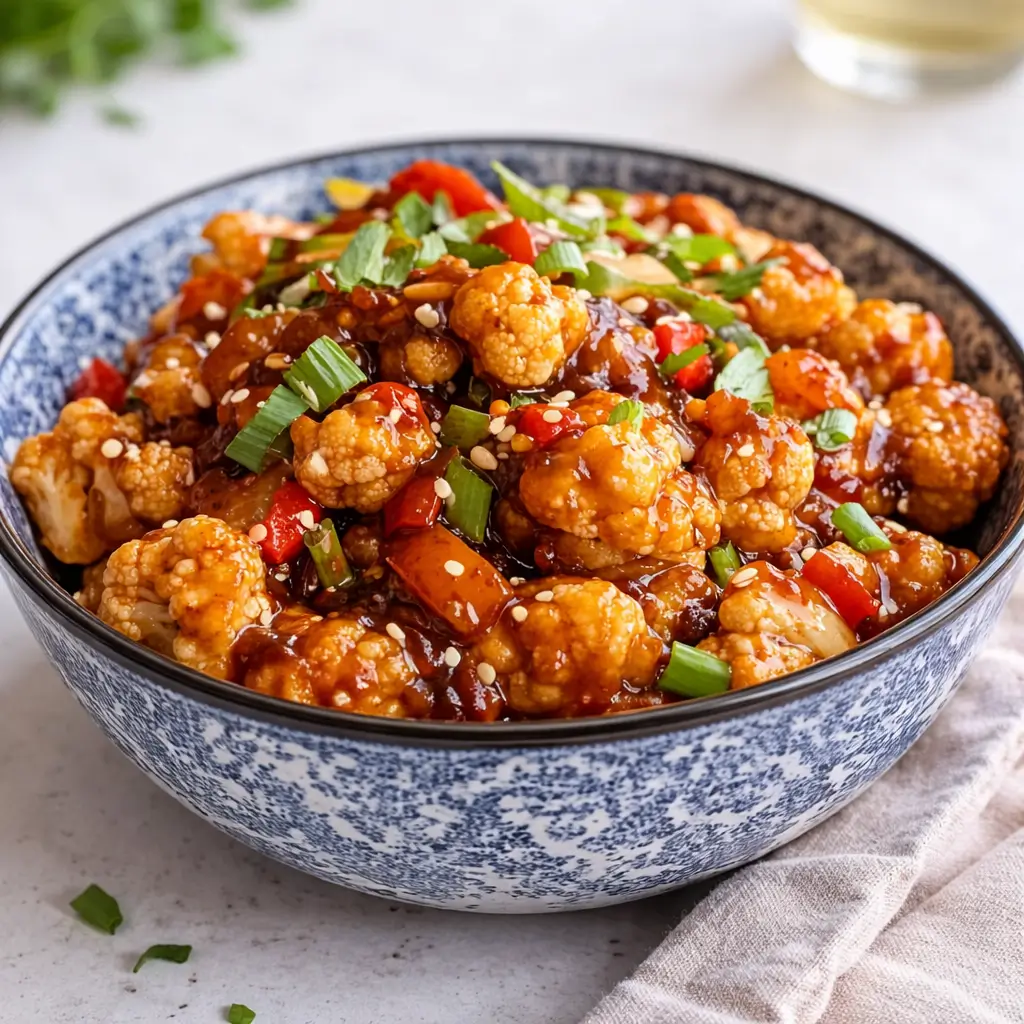
Kung Pao Cauliflower is the absolute best way to win over even the most stubborn vegetable skeptics in your house. If you are tired of the same old boring steamed veggies, this recipe is about to become your new kitchen obsession. I remember the first time I made this Kung Pao Cauliflower; my kids actually asked for seconds, which is basically a culinary miracle in our home. It has that perfect hit of ginger and garlic that makes your kitchen smell like a high-end bistro. Since we are all trying to eat a bit better without sacrificing flavor, this dish hits that sweet spot of being wholesome yet incredibly indulgent. It is crispy, sticky, and has just enough kick to keep things interesting.
What is Kung Pao Cauliflower?
Kung Pao Cauliflower is a modern, plant-based twist on the classic Szechuan dish that traditionally features chicken. Instead of meat, we use tender florets of cauliflower that get a professional-grade crunch from a simple batter. This version captures all the hallmark flavors you love: the tang of rice vinegar, the depth of soy sauce, and that signature crunch from toasted peanuts. It is a fantastic option for anyone following a vegan or gluten-free diet, but honestly, it is so delicious that nobody will even miss the meat. The cauliflower acts like a sponge, soaking up all that glorious sauce while staying surprisingly sturdy.
Reasons to Try Kung Pao Cauliflower
You should definitely try Kung Pao Cauliflower because it is a total lifesaver on those hectic weeknights when you want something better than takeout. It is much more affordable than ordering in, and you have complete control over the ingredients, which means less sodium and no hidden nasties. Plus, it is a brilliant way to sneak more fiber into your family’s diet without it feeling like a chore. The combination of textures is truly sensational, moving from the crispy exterior of the cauliflower to the snap of the bell peppers. It is a bold, colorful, and exciting meal that brings a bit of magic back to the dinner table.
Ingredients Needed to Make Kung Pao Cauliflower
- 1 medium head cauliflower: Look for a sturdy, bright white head with no brown spots for the best results.
- 1/2 cup cornstarch: This is the secret to getting that ultra-crispy, golden-brown coating we all crave.
- 1/2 cup water: Just enough to turn your dry ingredients into a smooth, dunkable batter.
- 1/2 cup all-purpose flour: You can easily swap this for rice flour if you need a gluten-free version.
- 1/2 tsp salt: A fundamental seasoning to bring out the natural sweetness of the vegetable.
- 1/2 tsp garlic powder: Adds a layer of savory depth to the batter itself.
- 1/4 tsp black pepper: Just a pinch for a little bit of back-end warmth.
- Oil for frying: Choose a neutral oil with a high smoke point like vegetable or canola oil.
- 1/4 cup soy sauce: This provides the salty, umami base for our incredible Kung Pao sauce.
- 2 tbsp hoisin sauce: Adds a lovely thickness and a hint of sweetness to the glaze.
- 1 tbsp rice vinegar: Essential for that bright, tangy zing that cuts through the richness.
- 1 tbsp brown sugar or maple syrup: To balance the heat and acidity perfectly.
- 1 tsp sesame oil: A little goes a long way in providing that authentic, nutty aroma.
- 2 cloves garlic, minced: Fresh is always best here for a truly aromatic experience.
- 1 tsp grated ginger: Adds a spicy, fresh zing that lifts the whole dish.
- 1 tsp cornstarch mixed with 2 tbsp water: Our “slurry” that makes the sauce thick and glossy.
- 1/2 tsp red pepper flakes: Adjust this based on how much you want to challenge your taste buds.
- 1/2 cup red and green bell peppers: Diced up to add a beautiful pop of color and freshness.
- 1/4 cup roasted peanuts: These provide a classic Kung Pao crunch that is absolutely non-negotiable.
- 2 green onions, sliced: The perfect fresh garnish to finish the plate.
Instructions to Make Kung Pao Cauliflower
Step 1: Prep Your Cauliflower Florets
The first move in this Kung Pao Cauliflower journey is getting your cauliflower ready for its makeover. Start by removing the green leaves and the tough core, then break the head down into bite-sized florets. You want them to be somewhat uniform in size so they cook evenly, roughly about the size of a large marble. If they are too big, the middle stays raw; if they are too small, they might get mushy. Give them a quick rinse and pat them dry thoroughly because any extra moisture will fight against that crispy coating we are trying to achieve.
Step 2: Create the Perfect Batter
Now, grab a large mixing bowl to whip up the batter that gives this Kung Pao Cauliflower its famous crunch. Whisk together your flour, cornstarch, salt, garlic powder, and black pepper, then slowly stream in the water. You are looking for a consistency that is thick enough to coat a spoon but thin enough to drip off slowly. Once the batter is smooth and lump-free, toss in your cauliflower florets. Use a spatula or your hands to ensure every single nook and cranny is covered in that mixture, as this is the key to a successful fry.
Step 3: Fry Until Golden and Crispy
Heat about an inch of oil in a large skillet or wok over medium-high heat. You can check if the oil is ready by dropping a tiny bit of batter in; if it sizzles immediately, you are good to go. Carefully place the battered cauliflower into the hot oil in batches, being careful not to overcrowd the pan. Fry them for about 3 to 4 minutes, turning them occasionally, until they are a gorgeous golden brown. Once they look irresistible, move them to a plate lined with paper towels to drain any excess oil while they stay hot and crunchy.
Step 4: Whisk Together the Signature Sauce
While your cauliflower is resting, it is time to build the flavor profile of the Kung Pao Cauliflower. In a medium bowl, whisk together the soy sauce, hoisin, rice vinegar, brown sugar, sesame oil, minced garlic, and grated ginger. This is also where you add your red pepper flakes for that signature heat. Finally, stir in your cornstarch and water slurry. This mixture might look thin now, but it will transform into a thick, glossy masterpiece once it hits the heat of the pan, coating every piece of cauliflower beautifully.
Step 5: Sauté the Veggies and Aromatics
Wipe out your pan or use a clean one with a tablespoon of fresh oil over medium heat. Throw in your diced red and green bell peppers and sauté them for just a couple of minutes. You want them to soften slightly but still retain a bit of their structural integrity and bright color. If you are feeling brave, this is the moment to add those dried red chilies for an authentic spicy punch. Add the roasted peanuts to the pan as well, letting them toast for a few seconds to release their natural oils and aroma.
Step 6: The Great Flavor Merger
Pour your prepared sauce into the pan with the peppers and peanuts. Stir it constantly for about a minute or two until you see it start to bubble and thicken into a rich, dark glaze. Now comes the best part: gently fold your crispy cauliflower florets back into the pan. Toss everything together with a light touch so you don’t break that beautiful crust you worked so hard on. Make sure every piece is drenched in the sauce. Cook for just another minute until everything is piping hot and the sauce is clinging to the cauliflower like a delicious hug.
Step 7: Garnish and Serve Immediately
Your Kung Pao Cauliflower is now ready for its big debut. Transfer the mixture to a large serving bowl or individual plates. Scatter those sliced green onions over the top for a fresh, sharp finish that cuts through the sweet and savory sauce. Serving this immediately is crucial to enjoy the contrast between the hot, sticky sauce and the crunchy cauliflower. It is a vibrant, restaurant-quality meal that looks just as good as it tastes, and I promise your guests will be asking for the recipe before they even finish their first bite.
What to Serve with Kung Pao Cauliflower
To turn this Kung Pao Cauliflower into a complete feast, I usually serve it over a bed of fluffy steamed jasmine rice or brown rice to soak up every drop of that sauce. If you want to keep things even lighter, cauliflower rice works surprisingly well too! For a bit of extra green on the table, a quick side of garlic-sautéed bok choy or a simple cucumber salad with a splash of rice vinegar is a terrific addition. If you are feeling extra fancy, some crispy vegetable spring rolls or steamed edamame make for a wonderful starter that fits the theme perfectly.
Key Tips for Making Kung Pao Cauliflower
One of the best tips for making Kung Pao Cauliflower is to ensure your oil is at the right temperature; if it is too cool, the batter will absorb the oil and become greasy. Always fry in small batches to keep the oil hot. If you are looking for a shortcut, you can actually use a bag of pre-cut cauliflower florets from the grocery store to save on prep time. For the ultimate crunch, try using rice flour in the batter; it creates a lighter, airier texture that stays crispy longer. Don’t be afraid to taste your sauce before adding it to the pan to adjust the sweetness or spice to your liking.
Storage and Reheating Tips for Kung Pao Cauliflower
If you happen to have any Kung Pao Cauliflower leftovers, store them in an airtight container in the fridge for up to three days. Just a heads-up: the cauliflower will lose some of its initial crunch as it sits in the sauce, but the flavors actually deepen and become even more delicious the next day. To reheat, I highly recommend using an air fryer or a toaster oven rather than a microwave. Heating it at 350°F for about 5 to 7 minutes will help bring back some of that original crispiness. It makes for a fantastic desk lunch that will definitely make your coworkers jealous.
FAQs
Can I make Kung Pao Cauliflower in an air fryer? Yes, absolutely! Just coat the battered florets in a little bit of oil spray and air fry at 400°F for about 15 minutes, shaking the basket halfway through.
Is this recipe spicy? It has a mild to medium kick depending on how many red pepper flakes you use. You can easily dial it back if you are cooking for little ones.
Can I use frozen cauliflower? I wouldn’t recommend it for this specific recipe, as frozen cauliflower tends to hold too much moisture, which prevents it from getting truly crispy.
Final Thoughts
Making Kung Pao Cauliflower at home is a rewarding experience that proves meatless meals can be just as satisfying and bold as their traditional counterparts. It is a versatile dish that works for a quick solo dinner or a fun weekend gathering with friends. By following these simple steps, you can create a meal that is healthy, vibrant, and packed with personality. I hope this recipe brings as much joy to your dinner table as it does to mine. Don’t forget to experiment with the veggies and heat levels to make it your own!
Visit our Pinterest for regular slow cooker recipe updates, or join our Facebook discussions where cooking fans exchange their favorite hearty meal ideas.
PrintKung Pao Cauliflower Recipe: Better Than Takeout and Truly Easy
This Kung Pao Cauliflower is crispy, saucy, and packed with that signature sweet-savory-spicy kick. Crunchy battered cauliflower gets tossed with a tangy Kung Pao-style sauce, bell peppers, and peanuts for a vegan-friendly meal that’s big on texture and flavor.
- Prep Time: 15 minutes
- Cook Time: 20 minutes
- Total Time: 35 minutes
- Yield: 4 servings
- Category: Main Course
- Method: Stir-fry
- Cuisine: Asian
Ingredients
For the Cauliflower:
- 1 medium head cauliflower, cut into florets
- 1/2 cup cornstarch
- 1/2 cup water
- 1/2 cup all-purpose flour (or rice flour for gluten-free)
- 1/2 teaspoon salt
- 1/2 teaspoon garlic powder
- 1/4 teaspoon black pepper
- Oil for frying (or baking/air-frying alternative below)
For the Kung Pao Sauce:
- 1/4 cup soy sauce (or tamari for gluten-free)
- 2 tablespoons hoisin sauce
- 1 tablespoon rice vinegar
- 1 tablespoon brown sugar or maple syrup
- 1 teaspoon sesame oil
- 2 cloves garlic, minced
- 1 teaspoon grated ginger
- 1 teaspoon cornstarch mixed with 2 tablespoons water (to thicken)
- 1/2 teaspoon red pepper flakes (or more for extra heat)
For Stir-Frying:
- 1 tablespoon oil
- 1/2 cup red bell pepper, diced
- 1/2 cup green bell pepper, diced
- 1/4 cup roasted peanuts or cashews
- 2–3 dried red chilies (optional, for authentic heat)
- 2 green onions, sliced (for garnish)
Instructions
1. Prepare the cauliflower: In a large bowl, combine the cornstarch, water, flour, salt, garlic powder, and black pepper. Stir until smooth. Add the cauliflower florets and coat evenly.
2. Fry the cauliflower: Heat oil in a large pan over medium-high heat. Fry the cauliflower in batches for 3 to 4 minutes, until golden and crispy. Transfer to a paper towel-lined plate.
3. Prepare the sauce: In a bowl, whisk together the soy sauce, hoisin sauce, rice vinegar, brown sugar (or maple syrup), sesame oil, garlic, ginger, cornstarch-water mixture, and red pepper flakes.
4. Stir-fry the vegetables: In the same pan, heat 1 tablespoon of oil. Add the red and green bell peppers and stir-fry for 2 to 3 minutes, until slightly softened.
5. Add peanuts and sauce: Stir in the peanuts (or cashews) and dried red chilies (if using), then pour in the sauce and stir to combine.
6. Combine cauliflower and sauce: Add the crispy cauliflower to the pan and toss gently to coat. Cook for 2 to 3 minutes, until the sauce thickens and clings to the cauliflower.
7. Serve: Garnish with sliced green onions and serve with steamed rice or noodles.
Notes
For a healthier alternative, bake or air-fry the cauliflower instead of frying it.
Adjust the red pepper flakes to your preferred spice level.
Add extra vegetables like snap peas or carrots for more crunch and color.
If you prefer a sweeter sauce, increase the brown sugar or maple syrup to taste.