Chicken Fajita Casserole – it’s one of those dishes that just screams comfort and flavor, without demanding hours of your precious time. Honestly, after a long day wrangling the kids and navigating the NYC hustle, the last thing I want to do is spend another hour chopping and stirring. That’s where this sensational bake comes in. It’s a brilliant way to get those vibrant fajita flavors into a hearty, make-ahead-friendly casserole that the whole family devours.
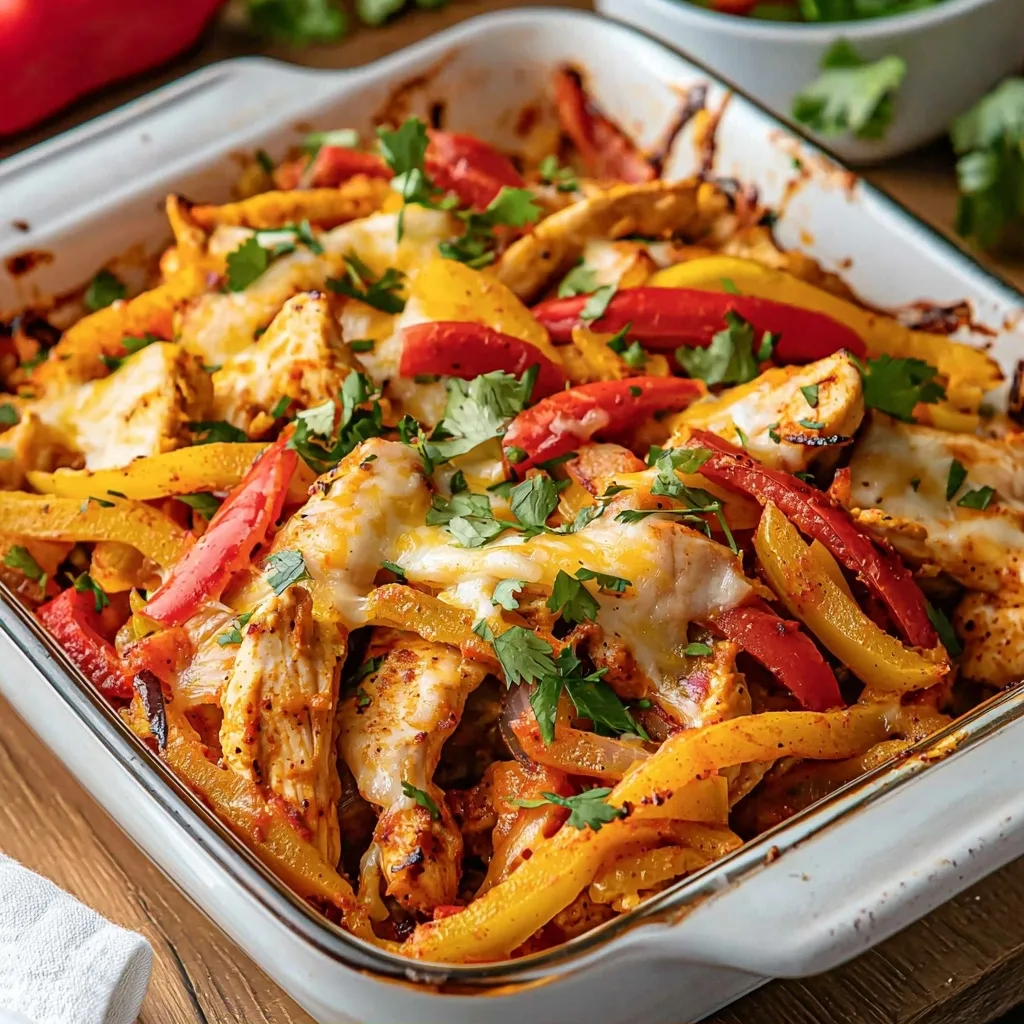
This isn’t just any casserole; it’s a deconstructed fajita, baked to gooey, cheesy perfection. Imagine tender strips of chicken, colorful bell peppers, and sweet onions, all tossed in a zesty fajita seasoning, then baked until bubbling under a blanket of melted cheese. It’s the kind of meal that fills your kitchen with an incredible aroma, making everyone gather around the table with eager anticipation. My kids practically race to the dinner table when they smell this cooking!
What is Chicken Fajita Casserole?
Chicken Fajita Casserole is essentially a baked dish that captures all the delicious, bold flavors of classic chicken fajitas but transforms them into a convenient, one-dish meal. Instead of serving sizzling fajita fillings on tortillas, everything is layered or mixed together in a baking dish and baked until hot and melty. It’s a clever adaptation that simplifies the fajita experience, making it perfect for busy weeknights or casual gatherings where you want maximum flavor with minimum fuss.
The magic truly lies in the simple yet impactful combination of ingredients. Sliced chicken breast gets a generous coating of fajita seasoning, mingling with vibrant strips of bell peppers and softened onions. This savory mix is then tucked into a casserole dish and often topped with a generous layer of shredded cheese, which melts into a glorious, gooey topping as it bakes. It’s a dish inspired by Tex-Mex cuisine, beloved for its straightforward preparation and utterly satisfying taste.
Reasons to Try Chicken Fajita Casserole
If you’re looking for a reliable, crowd-pleasing dinner that tastes like you spent hours in the kitchen, then you absolutely must try this chicken fajita casserole. It’s incredibly forgiving, meaning even if you’re new to cooking or just having one of those days, you’re almost guaranteed a delicious outcome. The active prep time is minimal – just a bit of slicing and mixing – which leaves you more time to relax or spend with your family instead of being chained to the stove.
What makes this dish a true hero is its versatility and speed. It’s perfect for busy parents, beginner cooks, or anyone who appreciates a hearty meal that comes together quickly. You can even prep some components ahead of time, making those weeknight dinners even smoother. Plus, the flavors are universally loved – a little spicy, a little savory, and incredibly comforting, especially when served with all the classic fajita fixings!
Ingredients Needed to Make Chicken Fajita Casserole
2 boneless, skinless chicken breasts (sliced into roughly 1-inch strips)
2 bell peppers (a mix of red and yellow looks beautiful, sliced into strips)
1 medium yellow or white onion (sliced into strips)
2 tablespoons fajita seasoning (divided between chicken and veggies)
2 tablespoons olive oil (divided between chicken and veggies)
1 cup shredded cheese (cheddar, Monterey Jack, or a Mexican blend works wonderfully)
Optional serving suggestions: 12 small flour tortillas (warmed), sour cream, finely diced tomatoes, diced avocado, fresh cilantro leaves, sliced jalapeños
Instructions to Make Chicken Fajita Casserole – Step by Step
Step 1: First things first, let’s get our chicken prepped and flavorful. In a large mixing bowl, combine one tablespoon of the fajita seasoning with one tablespoon of the olive oil. Toss in your sliced chicken breasts, and using your hands (the best tools for the job!), mix it all up until every single strip is beautifully coated. This step is key to infusing that incredible fajita flavor right into the chicken before it even hits the oven. It’s like giving the chicken a flavor bath!
Step 2: Now, take your greased 9×13 inch casserole dish and arrange the seasoned chicken strips evenly in the bottom. Make sure they’re in a single layer as much as possible for even cooking. It’s starting to look good already, isn’t it? This simple preparation ensures that the chicken will be tender and juicy when it comes out, the perfect foundation for our casserole.
Step 3: Don’t wash that bowl yet! Into the same bowl, add the remaining one tablespoon of fajita seasoning and the remaining one tablespoon of olive oil. Now, toss in your sliced bell peppers and onion strips. Give them a good mix to ensure they are all nicely coated with the zesty seasoning and oil. We want those veggies to absorb all that wonderful flavor, just like the chicken did.
Step 4: Add these seasoned pepper and onion strips right on top of the chicken in the casserole dish. You can arrange them artfully or just pile them on; either way, they’ll soften and meld beautifully during baking. The colors alone are stunning – vibrant reds, yellows, and that lovely sweetness from the onion, all ready to mingle with the chicken.
Step 5: Here comes the most satisfying part: the cheese! Sprinkle your shredded cheese evenly over the entire top of the chicken, peppers, and onions. We’re aiming for a beautiful, golden, bubbly blanket of cheese that will tie all the flavors together. I love using a sharp cheddar or a spicy Monterey Jack for an extra kick, but any good melting cheese works here.
Step 6: Now, pop that assembled casserole, uncovered, into a preheated oven at 350°F (175°C). Let it bake for about 30 to 35 minutes. You’re looking for the chicken to be cooked through and the cheese on top to be melted, bubbly, and perhaps even starting to turn a lovely golden brown around the edges. The kitchen will start smelling absolutely divine at this point!
Step 7: Carefully remove the glorious chicken fajita casserole from the oven. If you’re using fresh cilantro, sprinkle it over the top right away for a burst of freshness. Serve this piping hot, ideally with warmed flour tortillas on the side and all your favorite fajita toppings like sour cream, diced tomatoes, creamy avocado, and maybe a few sliced jalapeños if you like a bit of heat. Dig in and enjoy!
Chef’s Tips for a Perfect Result
Slice Uniformly: Ensure your chicken, peppers, and onions are sliced into similarly sized strips. This guarantees even cooking and makes for a more cohesive texture in every bite. Precision here makes a difference!
Don’t Skimp on Seasoning: Fajita seasoning is the star player. Make sure the chicken and vegetables are thoroughly coated. If you like it spicier, feel free to add a pinch of cayenne pepper or chili powder to the mix.
Cheese Choice Matters: Opt for a good melting cheese. A blend of cheddar and Monterey Jack provides both flavor and excellent gooeyness. Grate your own cheese for the creamiest melt; pre-shredded can sometimes have anti-caking agents that affect the texture.
Veggies Al Dente: Avoid overcooking the vegetables before baking if you prefer them with a slight bite. A quick sauté beforehand can help control their final texture, but for this recipe, they soften beautifully in the oven.
Serve It Hot: This casserole is best served immediately after baking when the cheese is perfectly melted and the flavors are at their peak. Warmed tortillas are a game-changer for serving.
Taste and Adjust: Always taste your seasoned chicken and veggies before they go into the dish. You might want a little more salt, pepper, or even a squeeze of lime juice to adjust the flavor profile to your liking.
Variations and Substitutions
Vegetarian Option: Swap the chicken for firm tofu or a can of black beans (rinsed and drained). Tofu should be pressed and cubed, then tossed with the seasoning. Beans can be added right before baking. This makes for a hearty meatless meal.
Spicy Kick: For those who love heat, add sliced jalapeños or serrano peppers directly into the casserole mixture along with the onions and bell peppers. You could also stir a teaspoon of your favorite hot sauce into the chicken marinade.
Gluten-Free Alternative: This recipe is naturally gluten-free if served without the flour tortillas. If you need to use tortillas, opt for gluten-free corn or rice tortillas, ensuring they are made in a certified gluten-free facility.
Lower Carb Version: Omit the tortillas entirely or serve the casserole over cauliflower rice. You can also load up on extra bell peppers and onions to bulk up the dish without adding carbs.
Creamy Texture Boost: Stir in a can of condensed cream of mushroom or cream of chicken soup (check for gluten-free if needed) or a cup of sour cream into the chicken and vegetable mixture before adding the cheese. This will create a richer, creamier casserole base.
How to Serve and Pair
This Chicken Fajita Casserole is fantastic served family-style, right out of the baking dish. Present it with a variety of colorful toppings spread out, letting everyone customize their bowl. For a true fajita experience, warm up small flour or corn tortillas. Load them up with the hearty chicken and veggie mixture from the casserole, then add toppings like a dollop of cooling sour cream or Mexican crema, fresh diced tomatoes, creamy chunks of avocado, a sprinkle of vibrant cilantro, and perhaps some sliced jalapeños for extra zing. This dish is a perfect main course for any casual weeknight dinner, a potluck, or a relaxed weekend gathering. It pairs wonderfully with a side of Mexican rice or simple refried beans for a complete and satisfying meal.
Storage and Reheating
Refrigerator
Leftover Chicken Fajita Casserole will keep beautifully in the refrigerator for up to 3 to 4 days. Make sure it has cooled down a bit before transferring it to an airtight container. This keeps it from getting soggy as it cools and prevents other foods in your fridge from absorbing any lingering aromas.
Freezer
For longer storage, this casserole freezes remarkably well. Portion the cooled casserole into freezer-safe containers or wrap individual servings tightly in plastic wrap followed by a layer of aluminum foil. Frozen casserole should last for about 2 to 3 months. Thaw overnight in the refrigerator before reheating.
Reheating
The best way to reheat this casserole is in the oven. Transfer a portion (or the whole thing if it’s unfrozen) to an oven-safe dish. Cover loosely with foil to prevent the cheese from burning and reheat at 350°F (175°C) for about 15-20 minutes, or until heated through. If the top looks a bit dry, you can add a tablespoon or two of water or chicken broth before reheating. For a quicker method, you can reheat individual servings in the microwave, but be mindful that the texture might be slightly softer.
Nutritional Values
Calories: 352 kcal
Protein: 25g
Carbohydrates: 31g
Fat: 16g
Fiber: 3g
Approximate values.
Frequently Asked Questions (FAQ)
Can I add different vegetables to my chicken fajita casserole?
Yes, absolutely! Feel free to add other vegetables like zucchini, corn, or even some chopped broccoli. Just ensure they are cut into similar sizes as the peppers and onions so they cook evenly. Different veggies will subtly alter the flavor profile and add more nutrients.
How do I know when my chicken fajita casserole is perfectly cooked?
Your chicken fajita casserole is done when the chicken is cooked through (no pink inside), the vegetables are tender, and the cheese on top is fully melted, golden, and bubbly. An instant-read thermometer inserted into the thickest part of the chicken should read 165°F (74°C).
My chicken fajita casserole turned out dry, what went wrong?
A dry casserole usually means it was overcooked or didn’t have enough moisture. Ensure your chicken and veggies are well-coated in oil and seasoning. If reheating, loosely covering with foil and adding a splash of liquid can help prevent it from drying out further.
Can I prepare the chicken fajita casserole ahead of time?
You can definitely prep ingredients like slicing chicken, peppers, and onions ahead of time, storing them separately in the fridge. You can even assemble the entire casserole a few hours before baking, keeping it covered in the refrigerator, but it’s best to add the cheese just before it goes into the oven for optimal melting.
What’s the best way to customize chicken fajita casserole?
Customization is key! Stir in some black beans, corn, or even a spoonful of salsa into the mix before topping with cheese. For a spicier version, add chopped jalapeños or a dash of hot sauce. Serve with your favorite toppings to make it uniquely yours.
CONCLUSION
This Chicken Fajita Casserole is a weeknight dinner superstar, delivering bold Tex-Mex flavors with minimal effort. It’s a simple, satisfying bake that’s perfect for busy families and anyone craving a flavorful, comforting meal. The irresistible combination of zesty chicken, peppers, onions, and melted cheese makes it an instant favorite.
PrintEasy Chicken Fajita Casserole: A Weeknight Dinner Hero

A hearty Tex-Mex-inspired casserole with tender chicken, bell peppers, and onions baked with melty cheese and vibrant fajita seasoning. Perfect for busy weeknights and family-friendly meals.
- Prep Time: 20
- Cook Time: 30
- Total Time: 50
- Yield: 6 servings
- Category: Dinner
- Method: Baking
- Cuisine: Tex-Mex
Ingredients
2 boneless chicken breasts
1 red bell pepper, sliced
1 yellow bell pepper, sliced
1 onion, sliced
1 tablespoon olive oil
2 tablespoons fajita seasoning
1 cup shredded cheddar cheese
Optional: 1/2 cup frozen corn kernels for added texture
Instructions
Preheat oven to 375°F (190°C)
Heat olive oil in a skillet over medium heat
Add chicken breasts and cook for 4-5 minutes per side until browned and mostly cooked through
Transfer to a large bowl, add bell peppers, onions, fajita seasoning, and toss to combine
Lightly grease a 9×13-inch baking dish
Spread the chicken and veggie mixture in the dish
Sprinkle shredded cheese over the top
Bake for 20-25 minutes, until cheese is golden and bubbly
Notes
Prep the chicken and veggies in advance for faster assembly
Use any cheese blend, like a mix of cheddar and Monterey Jack for extra flavor
Freeze uncooked mixture in an airtight container for up to 3 months