Lemon Thumbprint Cookies are the sunshiny treat your dessert table’s been missing. These soft, buttery cookies are bursting with fresh lemon flavor—thanks to a triple dose of lemon zest, lemon juice, and lemon curd—and drizzled with a sweet-tart lemon glaze that pulls it all together. Think buttery shortbread meets citrusy zing. They’re the kind of cookie that makes you pause mid-bite and go, “Okay…wow.”
Whether you’re baking for a holiday tray, a potluck, or just looking to treat yourself on a random Tuesday, Lemon Thumbprint Cookies deliver the goods. Plus, they’re surprisingly easy to make (yes, even with that “fancy” lemon curd filling), and the dough can be prepped in advance. Time-saving and crowd-pleasing? That’s what we call a win-win.
And hey, if life handed you lemons this week, this is one seriously sweet way to make use of them.
Table of Contents
What Are Lemon Thumbprint Cookies?
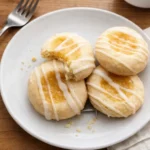
Lemon Thumbprint Cookies are delicate butter cookies rolled in sugar, pressed with your thumb (or the back of a spoon if you’re not into fingerprints), and filled with bright lemon curd before being baked and finished with a simple lemon icing. They’re soft, slightly chewy in the middle, and taste like sunshine got baked into every bite.
You’ll often see these cookies served around spring or during the holidays, but let’s be honest—they’re too good to wait for a “season.” Some folks swap out the lemon curd for jam (think raspberry or apricot), but when that lemon filling hits the buttery base and glaze? Chef’s kiss. They’re a citrus-lover’s dream.
And yes, if you’re one of those people who hoard lemon curd in your fridge like it’s gold (no judgment), this recipe is your golden excuse to use it generously.
Reasons to Try Lemon Thumbprint Cookies
Let’s be real—cookies are always a good idea. But here’s why these Lemon Thumbprint Cookies should be next up on your list:
- Flavor Bomb: They pack a lemony punch without being overpowering. You get brightness from the zest and juice, richness from the butter, and sweetness from the glaze. It’s balance, baby.
- Perfect Texture: These cookies are soft and creamy, with just the right bit of chew. The edges set up nicely, and that sugar coating gives a little sparkle (literally and taste-wise).
- Make-Ahead Friendly: Got a busy week ahead? You can chill the dough or even freeze the unbaked cookie balls. They’re perfect for “bake now, thank yourself later” situations.
- Crowd-Pleaser: Even non-lemon people (yep, they exist) love these. They’re a hit at bridal showers, Easter, Mother’s Day, and Tuesday afternoons alike.
- Customizable: While lemon is the star here, you can easily sub in raspberry or strawberry preserves. Just don’t skip the lemon icing—it ties the whole thing together.
They also pair ridiculously well with tea. Just sayin’.
Ingredients Needed to Make Lemon Thumbprint Cookies
For the Dough:
- 2¼ cups (281g) all-purpose flour, spooned and leveled
- 1 Tbsp (8g) cornstarch
- ¼ tsp salt
- 14 Tbsp (200g) unsalted butter, softened
- ¾ cup (150g) granulated sugar
- 1 Tbsp fresh lemon zest
- 1 Tbsp fresh lemon juice
- 1 large egg, at room temperature
- 1 tsp vanilla bean paste (or extract)
For Rolling & Filling:
- ½ cup (100g) granulated sugar (for rolling)
- ½ cup (140g) lemon curd (homemade or store-bought)
For the Icing:
- 1 cup (120g) confectioners’ sugar
- 2 Tbsp fresh lemon juice
Need a shortcut? This lemon curd recipe is easy and freezer-friendly if you want to go homemade.

Instructions to Make Lemon Thumbprint Cookies
This is your step-by-step guide to making the best Lemon Thumbprint Cookies at home. Follow along, and you’ll have a batch of citrusy goodness ready to impress.
Step 1: Whisk the Dry Ingredients
Grab a medium bowl and whisk together the flour, cornstarch, and salt. This combo gives you that soft, melt-in-your-mouth texture without being crumbly.
Step 2: Cream the Butter and Sugar
In a large bowl, beat the softened butter and ¾ cup sugar with an electric mixer until fluffy and pale—about 3 minutes. You’re looking for light and airy here. This step builds the base flavor, so don’t rush it.
Tip: Want to brush up on creaming technique? Our Top 5 Cookie Baking Tips walk you through the basics with visuals.
Step 3: Add the Lemon, Egg, and Vanilla
Mix in the lemon zest, lemon juice, egg, and vanilla paste. The mixture might look a little weird—like it curdled—but don’t panic. Once the dry ingredients go in, everything smooths out.
Step 4: Add the Dry Ingredients
Turn your mixer to low and slowly add the flour mixture. The dough should be soft and creamy, but not sticky. Cover the bowl and chill for at least 3 hours (or overnight if you’re planning ahead).
Step 5: Preheat & Prep
Preheat your oven to 350°F. Line baking sheets with parchment or silicone mats, and clear a spot in the fridge—you’ll be popping your trays back in before baking.
Step 6: Roll, Coat, and Shape
Scoop about 1 Tbsp of chilled dough and roll it into a ball. Then roll each ball in granulated sugar and space them 2 inches apart on your baking sheet.
Now, using your thumb (or the back of a ½ teaspoon), gently press a well into the center of each dough ball. Spoon in about ½ teaspoon of lemon curd.
Pop those trays in the fridge for 10–15 minutes while the oven finishes preheating. This helps prevent the cookies from spreading too much.
Step 7: Bake
Bake for 12–13 minutes, or until the edges are just starting to look set. The centers might still look soft—that’s a good thing.
Let the cookies cool on the tray for 5 minutes, then transfer to a wire rack.
Step 8: Drizzle That Icing
Once completely cool, whisk together the confectioners’ sugar and lemon juice. Drizzle over each cookie using a spoon, fork, or squeeze bottle. Let the icing set for 30 minutes before stacking, storing, or, you know, devouring half the tray.
Want another lemon fix while you wait? Check out our Lemon Raspberry Cookies—they’re like cousins to these thumbprints, but with berry flair.
What to Serve with Lemon Thumbprint Cookies
These cookies pair beautifully with light, bright flavors. Think of them as the Beyoncé of your dessert table—they shine solo, but play well with others.
- Tea or coffee: Earl Grey, chamomile, or even a lemony green tea brings out their citrus notes.
- Vanilla or berry ice cream: Use the cookies as a scoop-able base for a spring sundae.
- Fruit salad: A mix of fresh berries, melon, and mint balances the sweetness of the cookies.
- Other lemon desserts: Pair them with our Lemon Blueberry Icebox Cake for a lemon-lover’s dream spread.
Hosting brunch? Add these cookies to your pastry board alongside mini muffins, croissants, and a bowl of Strawberry Sauce.
Key Tips for Making Lemon Thumbprint Cookies
- Chill that dough: This isn’t optional. The dough is soft, and chilling helps it hold its shape and prevents spreading.
- Don’t overfill: A tiny bit of lemon curd goes a long way. If you overdo it, it’ll spill out during baking.
- Cool before icing: If you drizzle the icing while the cookies are warm, it’ll melt into a puddle. Patience, friends.
- Use real lemon zest and juice: Bottled lemon juice just doesn’t hit the same. Fresh is best here.
- Batch bake: Double the recipe and freeze unbaked cookie balls for future cravings. You’ll thank yourself on a rainy day.
Storage and Reheating Tips for Lemon Thumbprint Cookies
Room Temp: Store the cookies in an airtight container at room temperature for up to 1 week. Keep wax paper between layers if you’ve already glazed them.
Fridge: If your kitchen gets warm or humid, the fridge is your friend. They’ll stay fresh for 7–10 days, just bring to room temp before serving.
Freezer: You can freeze the baked cookies (iced or not) for up to 3 months. Let them thaw at room temperature. For unbaked dough balls, skip the sugar/curd, freeze on a tray, then transfer to a bag. Thaw, fill, and bake as usual.
Reheating: You don’t really need to reheat these—but if you want a fresh-from-the-oven vibe, microwave for 8–10 seconds or pop in a 300°F oven for 2–3 minutes.
FAQs
Can I make these gluten-free?
Yes! Use a 1:1 gluten-free baking flour. The texture might be slightly more delicate, but still delicious.
Can I skip the icing?
Sure—but it adds a lovely sweet-tart balance and finishes the look. Totally worth it.
Can I use jam instead of lemon curd?
You bet. Raspberry, strawberry, or apricot work great. Just know the lemon flavor will be milder.
Can I make these ahead of time?
Absolutely. The dough can chill for up to 3 days. You can also freeze baked or unbaked cookies—see above.
Do I have to use vanilla bean paste?
Nope! Pure vanilla extract works fine. But if you have paste, it does add a fancy twist.
Final Thoughts
Lemon Thumbprint Cookies are proof that small things can pack a punch. Whether you’re baking for a crowd or just treating yourself, these cookies bring the zingy brightness we all crave—especially during gloomy weeks or when your coffee break needs an upgrade.
Next time your grocery cart’s got a few lemons and you’re wondering what to do with them, remember: this recipe is always a good idea.
Want more citrus sweets? Don’t miss our Cream Cheese Filled Blueberry Lemon Bread or these soft, tangy Lemon Blueberry Cookies that people can’t stop talking about.
Visit our Pinterest for regular slow cooker recipe updates, or join our Facebook discussions where cooking fans exchange their favorite hearty meal ideas.
PrintLemon Thumbprint Cookies – Easy, Sweet, Zesty Treat
Sweet, soft lemon thumbprints are filled with lemon curd and drizzled with lemon icing. This creamy butter cookie dough is chilled before baking to ensure a tender, delicious result. Customize with your favorite jam or preserve for variety.
- Prep Time: 3 hours 40 minutes
- Cook Time: 13 minutes
- Total Time: 4 hours
- Yield: 36-40 cookies
- Category: Dessert
- Method: Baking
- Cuisine: American
- Diet: Vegetarian
Ingredients
Dough:
- 2 and 1/4 cups (281g) all-purpose flour, spooned and leveled
- 1 tablespoon (8g) cornstarch
- 1/4 teaspoon salt
- 14 tablespoons (200g) unsalted butter, softened to room temperature
- 3/4 cup (150g) granulated sugar
- 1 tablespoon fresh lemon zest
- 1 tablespoon fresh lemon juice
- 1 large egg, at room temperature
- 1 teaspoon vanilla bean paste (or vanilla extract)
Coating & Filling:
- 1/2 cup (100g) granulated sugar
- 1/2 cup (140g) homemade or store-bought lemon curd
Icing:
- 1 cup (120g) confectioners’ sugar
- 2 tablespoons (30ml) fresh lemon juice
Instructions
1. In a medium bowl, whisk together flour, cornstarch, and salt. Set aside.
2. In a large bowl, cream butter and 3/4 cup granulated sugar on medium-high speed for about 3 minutes.
3. Add lemon zest, lemon juice, egg, and vanilla bean paste. Beat until combined. Scrape bowl as needed.
4. Add dry ingredients and mix on low speed until combined. Dough will be soft. Cover and refrigerate for at least 3 hours and up to 3 days.
5. Line baking sheets with parchment or silicone mats. Prepare space in fridge to chill shaped cookies.
6. Scoop 1 tablespoon of chilled dough and roll into balls. Roll each ball in granulated sugar and place 2 inches apart on baking sheet.
7. Use thumb to make an indentation in center of each dough ball. Fill each with 1/2 teaspoon lemon curd.
8. Place baking sheets with shaped cookies in fridge while oven preheats to 350°F (177°C).
9. Bake cookies for 12–13 minutes, until edges are set and lightly browned. Cool on baking sheet for 5 minutes, then transfer to wire rack.
10. In a small bowl, whisk confectioners’ sugar and lemon juice to make icing. Drizzle over cooled cookies.
11. Let icing set for 30 minutes before stacking or storing.
Notes
Refrigeration is key to prevent overspreading—don’t skip the chilling steps.
Vanilla bean paste adds extra flavor but can be replaced with extract.
Try raspberry, apricot, or strawberry jam as an alternative to lemon curd.
Dough or baked cookies can be frozen for up to 3 months. Thaw before baking or serving.
Use lemon icing even if swapping fillings to keep the bright lemon flavor.