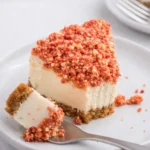
Instant Pot Strawberry Crunch Cheesecake is about to be your new favorite dessert obsession. This fun, nostalgic treat brings together the creamy comfort of classic cheesecake with the sweet, crumbly magic of strawberry crunch topping—yes, like the kind from those iconic ice cream bars we all begged for as kids.
Made right in your Instant Pot (because who has time for a water bath and cracked tops?), this beauty is rich, smooth, and loaded with strawberry shortcake vibes in every single bite. And here’s the real kicker—it looks fancy, but it’s totally doable, even on a weekday. From the buttery Nilla Wafer crust to the vibrant strawberry topping and crunchy crumble, this cheesecake is a dessert win all around. Whether you’re baking for a birthday, potluck, or just to celebrate the fact that it’s Thursday, Instant Pot Strawberry Crunch Cheesecake hits the sweet spot.
Table of Contents
What is Instant Pot Strawberry Crunch Cheesecake?
Instant Pot Strawberry Crunch Cheesecake is a decadent dessert made with a creamy cheesecake base, baked over a buttery Nilla Wafer crust, and topped with a thick layer of strawberry topping and golden Oreo strawberry crumble. The whole thing comes together in the Instant Pot, which gently cooks the cheesecake with steam—keeping it perfectly moist and free of those dreaded cracks.
The “crunch” comes from crushed Oreos mixed with strawberry Jell-O and whipped cream—sounds weird, but trust me, it’s chef’s kiss. If you’ve ever had one of those strawberry shortcake ice cream bars, the flavor and texture will feel like a sweet little throwback. And the Instant Pot makes the process easier and more foolproof than traditional baking. It’s creamy, tangy, sweet, crunchy—all the good things layered into one show-stopping dessert.
Reasons to Try Instant Pot Strawberry Crunch Cheesecake
If the words “Instant Pot” and “cheesecake” in the same sentence aren’t enough to make you curious, let’s get into why this dessert deserves a spot in your recipe box. First off, it’s surprisingly easy. No worrying about oven temps or water baths. Just set it and let the Instant Pot do the heavy lifting. Second, the texture is out-of-this-world creamy.
The steam pressure creates a super smooth, dense cheesecake that you just can’t get with regular baking. Third, can we talk about that strawberry crunch topping? It’s got this sweet, crumbly vibe that instantly gives you ice cream truck nostalgia. Also, this recipe is perfect for impressing guests without a ton of effort. And for busy folks? You can prep it ahead—just chill overnight and top it the next day. Last, it’s a hit with everyone from picky eaters to your cheesecake-snob cousin. Basically, this recipe is a guaranteed crowd-pleaser.
Ingredients Needed to Make Instant Pot Strawberry Crunch Cheesecake
For the crust:
- 1 1/2 cups Nilla Wafer crumbs
- 3 tablespoons butter, melted
For the cheesecake filling:
- Three 8 oz. packages cream cheese (room temp; Philadelphia recommended)
- 1/2 cup Dixie Crystals granulated sugar
- 2 tablespoons flour
- 1 teaspoon vanilla extract
- 1/2 cup heavy whipping cream
- 2 eggs
For the topping:
- 10 golden Oreo cookies
- 2 tablespoons strawberry Jell-O mix
- 3–4 tablespoons whipped cream
- 1/4 cup strawberry topping or preserves
Instructions to Make Instant Pot Strawberry Crunch Cheesecake
Making this Instant Pot Strawberry Crunch Cheesecake is a breeze once you know the steps. Here’s your step-by-step guide to cheesecake bliss—trust me, you got this.
Prepping the Crust
Start by preheating your oven to 350°F. Toss those Nilla Wafers into a food processor and pulse them into fine crumbs. You’ll want about 1 1/2 cups’ worth. Pour in the melted butter and pulse again until the crumbs look like damp sand. Press this mixture into a greased 7-inch springform pan, making sure to bring the crust up about an inch on the sides. Pop it in the oven and bake for 10 minutes, or until lightly golden and fragrant. Set it aside to cool while you move on to the filling.
Mixing the Filling
Grab your stand mixer (or a hand mixer) and cream the cream cheese on medium speed for 3–4 minutes, scraping the bowl as you go. You want this totally smooth, like silky smooth. Add in the sugar and flour, mixing just until blended. Pour in the vanilla and heavy whipping cream. Mix on low, then bump it up to high for about a minute. Now scrape down the sides one more time before adding your eggs. Add them one at a time, mixing just until the yolk disappears. Don’t overmix—we want rich, not fluffy.
Building the Cheesecake
Pour the luscious batter into your cooled crust and give the pan a few gentle taps on the counter to pop any air bubbles. Cover the pan tightly with aluminum foil. This helps keep condensation off the top during pressure cooking. Now, pour one cup of water into your Instant Pot. Place the trivet inside and set the foil-covered cheesecake on top.
Cooking in the Instant Pot
Lock the lid, set the valve to sealing, and cook on high pressure for 40 minutes. Let the pressure naturally release when it’s done—this might take about 15–20 minutes. Once you can open the lid, carefully lift out the cheesecake using tongs or a sling. Let it cool on a wire rack until it hits room temp. Then transfer it to the fridge and chill for at least 6 hours (but overnight is chef’s choice).
Making the Crunch Topping
Time for the fun part! Add your golden Oreos to the food processor and pulse a few times until you’ve got coarse crumbs. Remove half and mix them in a small bowl with the strawberry Jell-O mix and whipped cream. Use a fork to stir everything together until it’s evenly colored and crumbly. Add the crumb mix back to the processor and pulse a few more times. You’re looking for that perfect strawberry shortcake texture.
Final Assembly
Spread the strawberry topping or preserves over the chilled cheesecake. You can use the back of a spoon to swirl it out evenly. Then shower it with the strawberry crunch topping. Be generous—this is not the time to be shy. Slice, serve, and get ready for all the compliments.
Want more fun strawberry treats? You’ll love our Strawberry White Chocolate Gooey Bars or the retro favorite Strawberry Crunch Poke Cake for even more strawberry dessert inspiration.
What to Serve with Instant Pot Strawberry Crunch Cheesecake
Honestly, this cheesecake doesn’t need anything—it’s a full-on dessert experience all by itself. But if you’re building a party menu or just want to be extra, here are a few tasty pairings. A glass of bubbly (champagne or sparkling rosé) makes it feel like a celebration. A bold cup of coffee or a shot of espresso balances the sweetness beautifully. For a fun summertime spread, pair it with lighter desserts like Strawberry Pretzel Salad or Strawberry Cheesecake Fluff Salad—because yes, two strawberry desserts are totally allowed. If you’re serving brunch, a slice of this cheesecake with something savory like High Protein Unstuffed Peppers keeps things balanced. However you serve it, this cheesecake shines.
Key Tips for Making Instant Pot Strawberry Crunch Cheesecake
First tip: don’t skip the foil! Covering the cheesecake helps keep the top smooth and water-free. Second: use room-temperature cream cheese for a smoother batter. Cold cream cheese = lumps, and nobody wants that. Third: resist the urge to overmix the batter after adding eggs—it can make the texture weird. Fourth: let it chill. I know, waiting overnight is tough, but it really makes a difference in flavor and firmness. Fifth: only add the crunch topping right before serving, or it’ll lose its crispy texture. Want to try other cheesecake ideas too? Check out our no-bake Pink Velvet Cheesecake Bites for an easy no-oven-required option. And finally—use name-brand cream cheese. It makes a difference, and it’s worth the extra dollar.
Storage and Reheating Tips for Instant Pot Strawberry Crunch Cheesecake
This cheesecake is best fresh, but if you’ve got leftovers (lucky you), here’s how to keep them tasting great. Store the cheesecake in an airtight container in the fridge for up to 3 days. Make sure it’s sealed tight to keep the crumble from going soggy. Pro tip: if you know you won’t eat it all in one go, store the strawberry topping and crumble separately. Then add them fresh when serving. Don’t freeze the fully assembled cheesecake—the texture and topping just don’t survive. You can freeze the cheesecake base (pre-topping) for up to 2 months. Thaw it overnight in the fridge and then add fresh topping before serving. Want more ideas for what freezes well? Our Chocolate Chip Mini Bundt Cakes are freezer-friendly and just as indulgent.
FAQs
Can I use a different crust?
Absolutely. Graham crackers or golden Oreos also work great. Just make sure you get the same crumb consistency.
Can I make this without an Instant Pot?
You can, but the texture will be slightly different. Use a water bath in the oven and bake at 325°F for about an hour.
Do I have to chill it overnight?
Technically no, but it tastes better and slices cleaner after a long chill. If you’re in a pinch, give it at least 4–5 hours.
Can I make it gluten-free?
Sure! Swap in gluten-free cookies for the crust and topping, and use a gluten-free flour like Cup4Cup.
Is there a dairy-free version?
This one’s pretty dairy-forward, but you could experiment with vegan cream cheese and coconut cream—though results may vary.
Final Thoughts
There’s just something about Instant Pot Strawberry Crunch Cheesecake that feels nostalgic and totally modern at the same time. It’s that perfect mix of creamy, sweet, and crunchy—and it’s all made in your Instant Pot without stress. Whether you’re feeding a crowd or sneaking a slice for breakfast (we won’t judge), this recipe has the wow factor without the hassle. It’s one of those desserts that people will ask you for again and again. So go ahead, grab your mixer, power up that pressure cooker, and make dessert magic happen. And if you’re craving even more strawberry-filled ideas, check out our popular Strawberry Earthquake Cake or try our summery Strawberry Rolls with Lemon Icing next!
Visit our Pinterest for regular slow cooker recipe updates, or join our Facebook discussions where cooking fans exchange their favorite hearty meal ideas.
PrintInstant Pot Strawberry Crunch Cheesecake – Creamy & Irresistible
This Instant Pot Strawberry Crunch Cheesecake has a creamy cheesecake layer, baked on a Nilla Wafer crust, and covered with strawberry shortcake crumbles!
- Prep Time: 10 mins
- Cook Time: 50 mins
- Total Time: 7 hrs
- Yield: 8 servings
- Category: Dessert
- Method: Instant Pot
- Cuisine: American
- Diet: Vegetarian
Ingredients
Crust:
- 1 1/2 cups Nilla Wafer crumbs
- 3 Tablespoons butter, melted
Filling:
- 3 (8 oz.) packages cream cheese, room temperature
- 1/2 cup granulated sugar
- 2 Tablespoons flour
- 1 teaspoon vanilla extract
- 1/2 cup heavy whipping cream
- 2 eggs
Topping:
- 10 golden Oreo cookies
- 2 Tablespoons strawberry Jell-o mix
- 3–4 Tablespoons whipped cream
- 1/4 cup strawberry topping or preserves
Instructions
1. Preheat your oven to 350°F.
2. Add Nilla Wafers to a food processor until you get about 1 1/2 cups of crumbs. Add in the melted butter and pulse until combined.
3. Pour into the bottom of a greased 7″ springform pan and press to form a crust, bringing the crumbs up about 1 inch on the sides.
4. Bake the crust for 10 minutes or until golden. Remove and cool on a wire rack.
5. In a stand mixer (or with a hand mixer) using a paddle attachment, cream the cream cheese for 3-4 minutes until smooth with no lumps.
6. Slowly pour in the sugar and flour and mix until just combined.
7. Add vanilla and heavy cream. Mix on low speed until combined, then slowly increase to high for 1 minute.
8. Scrape the sides and bottom of the bowl to ensure it’s lump-free. Mix once more before adding eggs.
9. Add the eggs one at a time, mixing just until the yolk disappears.
10. Pour the batter into the prepared crust and tap gently to release air bubbles.
11. Cover the pan with aluminum foil. Add 1 cup of water to the Instant Pot and place the trivet inside.
12. Place the cheesecake on the trivet and cook on high pressure for 40 minutes. Let it naturally release.
13. Once the pot opens, remove the cheesecake and cool to room temperature on a wire rack.
14. Refrigerate the cheesecake for at least 6 hours, preferably overnight.
15. For the topping, pulse Oreo cookies in a food processor 5-6 times for a coarse crumb. Remove half to a bowl.
16. Add Jell-o mix and whipped cream to the bowl and mix with a fork. Return to processor and pulse 2-3 more times.
17. Spread strawberry topping over the chilled cheesecake in an even layer.
18. Sprinkle the strawberry crumbles over the topping.
19. Serve and enjoy!
Notes
It is not recommended to refrigerate this cheesecake after topping as the crumbles may become soggy. For best results, store in an airtight container to minimize moisture exposure.
Leftovers should be kept in an airtight container in the refrigerator for up to three days.
You can prepare the cheesecake a day in advance and add the topping just before serving for optimal texture.