Shamrock Sugar Cookies are that sweet little nod to St. Patrick’s Day we all need in our lives—festive, buttery, and fun to decorate (even if your shamrocks come out a little… abstract). Whether you’re baking for your kids’ classroom party, your office potluck, or just because green frosting makes you happy, this is your go-to recipe. These sugar cookies strike that perfect balance: crispy edges, soft centers, and just enough sweetness to make you reach for a second… or third.
The primary keyword, Shamrock Sugar Cookies, isn’t just about cuteness—these cookies are downright delicious. The dough rolls out like a dream, holds its shape when baked, and the decorating part? That’s where you let your inner child go wild. Green icing, sprinkles, edible glitter—anything goes. Plus, you only need basic pantry staples, which means no frantic store runs. Just you, some flour, and a little Irish-inspired fun.
Table of Contents
What Are Shamrock Sugar Cookies?
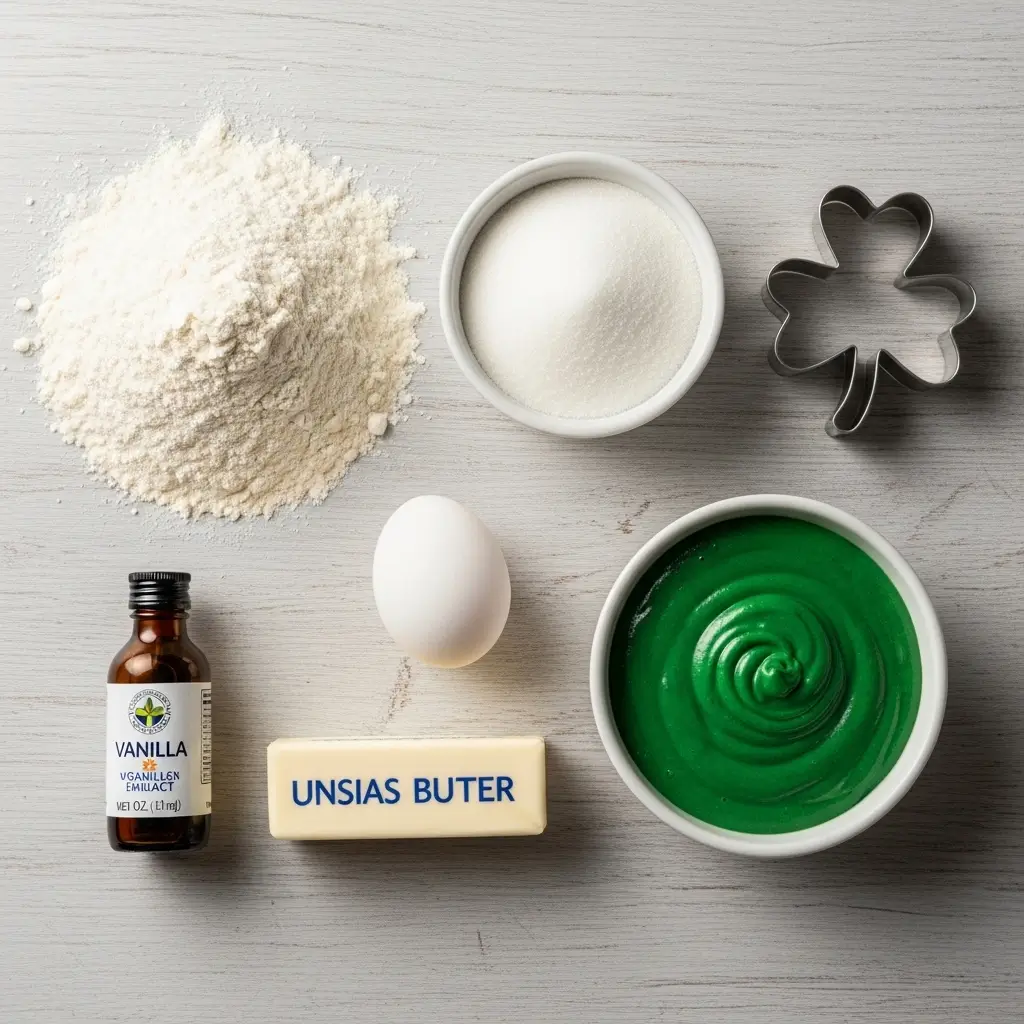
Shamrock Sugar Cookies are classic cut-out sugar cookies shaped like shamrocks, typically decorated with green icing and festive sprinkles. Think of them as the St. Patrick’s Day cousin of Christmas cookies—cheerful, buttery, and perfect for decorating with the kids or indulging your own creative side. At the heart of it, you’ve got a straightforward sugar cookie base: flour, sugar, butter, egg, and a splash of vanilla.
What makes them “shamrock” is the shape and seasonal flair—usually a shamrock cookie cutter paired with vibrant green decorations. You can use homemade icing or store-bought for ease. And if you’re short on time (or patience), no one’s judging if you just dip them and call it a day. They’re simple enough for beginner bakers, but charming enough to impress at any party. They’re also great make-ahead cookies, holding up beautifully for a few days in an airtight container.
Reasons to Try Shamrock Sugar Cookies
Honestly, why not? But if you need a little nudge, here’s why Shamrock Sugar Cookies deserve a spot in your kitchen this March. First, they’re incredibly easy. The dough comes together in minutes, and if you’ve got a shamrock cookie cutter, you’re halfway to festive already. Second, they’re versatile. Make them soft and chewy or give them a crisp bite by adjusting the bake time.
Third, let’s talk decoration. This is a holiday where more is more—green frosting, gold sprinkles, maybe even some edible glitter. The cookies themselves are like little edible art canvases. And if you’re looking for a fun activity with kids? These are a lifesaver. Also, they’re the perfect sweet treat to pair with something savory—like this Copycat Costco Chicken Bake for a potluck-friendly combo. Lastly, they freeze well, so you can make a batch ahead and not worry when the holiday chaos hits.
Ingredients Needed to Make Shamrock Sugar Cookies
- 2 ¾ cups all-purpose flour
- 1 teaspoon baking powder
- ½ teaspoon salt
- 1 cup unsalted butter, softened
- 1 ½ cups granulated sugar
- 1 large egg
- 1 teaspoon vanilla extract
- Green icing (store-bought or homemade)
- Green sprinkles (optional)
Instructions to Make Shamrock Sugar Cookies
Let’s walk through how to make Shamrock Sugar Cookies step by step, from mixing the dough to decorating those adorable green shamrocks. This is a fun and rewarding recipe that even beginner bakers can master. Follow each step carefully for sweet success—and don’t forget to check out our ingredient substitutions guide if you’re missing something from the pantry.
Step 1: Preheat and Prepare Your Baking Sheets
Step by step, the first thing you’ll want to do is set the stage. Preheat your oven to 350°F (175°C). While that warms up, line a couple of baking sheets with parchment paper. This keeps the cookies from sticking and helps them bake evenly. If you’ve ever struggled with cookies spreading too much, using parchment paper (or silicone baking mats) can be a game-changer.
Step 2: Combine Dry Ingredients
In a medium mixing bowl, whisk together 2 ¾ cups of all-purpose flour, 1 teaspoon of baking powder, and ½ teaspoon of salt. This step is all about distribution—you’re making sure the leavening agent and salt are spread evenly through the flour. If you’re baking in bulk or experimenting with other flour types, visit our baking prep tips page for more help on flour swaps and measuring hacks.
Step 3: Cream Butter and Sugar Until Fluffy
Now we move on to the wet ingredients—this is where the magic begins. In a large bowl, use a hand or stand mixer to cream together 1 cup of softened unsalted butter and 1 ½ cups of granulated sugar. Beat on medium speed for 2–3 minutes until the mixture looks light and fluffy. Don’t rush this—creaming creates tiny air pockets that give your cookies their soft texture. If your butter isn’t soft enough, slice it into cubes and let it sit at room temp for 15 minutes (or give it a 5-second zap in the microwave, but watch it closely!).
Step 4: Mix in Egg and Vanilla
Once the butter and sugar are creamed, beat in 1 large egg and 1 teaspoon of vanilla extract. Mix until smooth. This step helps bind everything together while adding a subtle flavor base. Want to switch things up? Almond extract or even a splash of orange zest can add a twist—check out flavoring tips for cookies if you’re in the mood to experiment.
Step 5: Gradually Add Dry to Wet Mixture
With the mixer on low speed (to avoid a flour explosion), slowly add the dry mixture to your wet ingredients. Mix just until everything is combined—don’t overdo it. Overmixing develops the gluten in the flour, which can make your cookies tougher and chewier (not what we’re going for here). The dough should be soft but not sticky. If it feels too sticky to roll, refrigerate it for about 15–20 minutes.
Step 6: Roll and Cut with Shamrock Cookie Cutter
Now for the fun part! Lightly flour your work surface and rolling pin, then roll the dough out to about ¼ inch thick. Keep the surface floured just enough to prevent sticking. Using a shamrock-shaped cookie cutter, press down firmly and lift cleanly to form your cookies. Don’t twist the cutter—press and lift for the sharpest edges. If you don’t have a shamrock cutter, you can use heart shapes to build a clover—get creative! Re-roll scraps gently to avoid overworking the dough.
Step 7: Bake to Perfection
Transfer your cookie cutouts to the prepared baking sheets, spacing them about an inch apart. Bake in the preheated oven for 8–10 minutes, or until the edges are just barely golden. Keep a close eye on them—baking too long can dry them out. For softer cookies, pull them out right at 8 minutes. For a crispier bite, lean closer to 10 minutes. If you’re baking multiple trays, rotate them halfway through to bake evenly.
Step 8: Cool Completely Before Decorating
Once baked, let the cookies rest on the tray for 2 minutes, then transfer them to a wire rack to cool completely. Cooling is key. If you decorate while the cookies are warm, the icing will slide right off. While they cool, prep your green icing and sprinkles—or take a peek at our Simple and Comforting Chicken Noodle Soup recipe if you want something savory to enjoy alongside your baking session.
Step 9: Decorate Your Shamrocks
Once the cookies are fully cooled, it’s time to channel your inner artist. Use green icing (homemade or store-bought—no judgment!) to decorate the cookies. Outline the edges first, then flood the center for a smooth finish. Want more sparkle? Top with green sprinkles or edible glitter before the icing sets. Let the icing dry completely before stacking or storing. Need a homemade icing tutorial? That’s coming soon—stay tuned!
What to Serve with Shamrock Sugar Cookies
These cookies are sweet, so pairing them with something savory balances things out. Consider setting them out alongside a cozy main like Hot Honey Chicken Cutlets or even some coffee or Irish cream (for the grown-ups, obviously). They also go great with a glass of milk or a hot cup of tea if you’re serving them at a St. Patrick’s Day brunch. If you’re hosting a themed party, consider adding Creamy Dill Pierogi Soup to the table—because sweet and savory is a power combo. These cookies shine as dessert, party favors, or lunchbox surprises for the kiddos.
Key Tips for Making Shamrock Sugar Cookies
Here’s the secret sauce (well, sugar) to getting perfect Shamrock Sugar Cookies every time. First, chill the dough if it feels too soft—it’ll hold its shape better when baking. Second, flour your surface lightly. Too much, and your dough dries out. Third, don’t skip cooling the cookies before decorating—warm cookies and frosting don’t play nice. If you’re using homemade icing, make it thick enough to not drip everywhere. Want clean edges? Use a metal cookie cutter and press straight down, no twisting. Also, don’t crowd your baking sheet. They need space to bake evenly. Finally, if you’re decorating with kids, let them have fun—even if your shamrocks look more like blobs, they’ll still taste great.
Storage and Reheating Tips for Shamrock Sugar Cookies
These cookies store like champs. Once decorated and fully set, place them in an airtight container with parchment between layers. They’ll stay fresh for up to 5 days at room temp. If you want to freeze them, freeze the un-decorated cookies and frost them after thawing for best results. Freeze in a single layer first, then transfer to a zip-top bag. Want to warm them slightly? A quick 5-second zap in the microwave gives them that just-baked softness again. Avoid reheating decorated cookies—they’ll melt into a green puddle (unless that’s your vibe).
FAQs
Can I use store-bought dough? Sure, but homemade tastes better and holds the shamrock shape better.
What if I don’t have a shamrock cutter? Use a heart-shaped cutter and arrange three hearts in a clover pattern. Add a little stem with a knife!
Do I have to use green icing? Not at all! Use whatever you like—rainbow, white, or go wild with edible gold.
Can I make these gluten-free? Yup—just use a 1:1 gluten-free flour blend.
Can kids help with this recipe? 100%. Cutting and decorating are kid-approved activities!
Final Thoughts
Shamrock Sugar Cookies are a fun, festive, and downright tasty way to celebrate St. Patrick’s Day. They’re easy enough for a beginner but customizable for pros who want to show off their piping skills. Whether you’re baking them with kids or whipping up a batch for a party, they’re the kind of cookie that brings smiles. And hey, even if your shamrocks look a little lopsided, nobody’s turning down a homemade cookie. Want more holiday treats or cozy recipes? Check out our most-loved dishes like Classic Homemade Chicken Noodle Soup or our viral Garlic Parmesan Chicken Bake for your next dinner night in.
Visit our Pinterest for regular slow cooker recipe updates, or join our Facebook discussions where cooking fans exchange their favorite hearty meal ideas.
PrintShamrock Sugar Cookies: Soft, Sweet, and Perfect for St. Patrick’s Day

These Shamrock Sugar Cookies are one of my favorite St. Patrick’s Day treats to bake. With their soft, buttery texture and festive green icing, they’re perfect for celebrating!
- Prep Time: 20 minutes
- Cook Time: 10 minutes
- Total Time: 30 minutes
- Yield: 24 cookies
- Category: Dessert
- Method: Baked
- Cuisine: American
Ingredients
- 2 ¾ cups all-purpose flour
- 1 teaspoon baking powder
- ½ teaspoon salt
- 1 cup unsalted butter, softened
- 1 ½ cups granulated sugar
- 1 large egg
- 1 teaspoon vanilla extract
- Green icing (store-bought or homemade)
- Green sprinkles (optional)
Instructions
1. Preheat your oven to 350°F (175°C) and line baking sheets with parchment paper.
2. In a bowl, whisk together the flour, baking powder, and salt. Set aside.
3. In a large mixing bowl, cream the softened butter and granulated sugar until light and fluffy.
4. Beat in the egg and vanilla extract until well combined.
5. Gradually add the dry ingredients to the wet mixture, mixing until just combined.
6. Roll out the dough on a floured surface to about ¼ inch thick. Use a shamrock cookie cutter to cut out shapes.
7. Place the cookies on the prepared baking sheets and bake for 8–10 minutes or until the edges are lightly golden.
8. Allow the cookies to cool completely before decorating with green icing and sprinkles.
Notes
To make homemade green icing, mix powdered sugar with a little milk and green food coloring until desired consistency is reached.
Be careful not to overbake the cookies—they should be just set and lightly golden at the edges.
Store cookies in an airtight container at room temperature for up to 5 days.
Freeze undecorated cookies for up to 2 months, then decorate after thawing.