Salted Caramel Protein Balls are the kind of snack that makes you feel like you’ve got your life together—without actually having to spend hours in the kitchen. Packed with natural ingredients like Medjool dates, cashews, vanilla protein powder, and a pinch of sea salt for that classic salted caramel twist, these little bites are both satisfying and sneaky-healthy.
Whether you’re juggling Zoom meetings, chasing toddlers, or powering through your afternoon slump, these protein-packed bites are your new best friend. Bonus? They’re naturally gluten-free, vegan, and free from added sugars, so you can snack happy. Oh, and did I mention? They take all of 10 minutes to whip up. Salted Caramel Protein Balls aren’t just a treat—they’re a smart snack disguised as dessert.
Table of Contents
What Are Salted Caramel Protein Balls?
Salted Caramel Protein Balls are like the overachievers of the snack world. They’re small, round energy bites made from wholesome, pantry-friendly ingredients that mimic the flavor of your favorite chewy caramel candy—minus the guilt. Thanks to the natural sweetness of dates, a sprinkle of sea salt, and a good scoop of vanilla protein powder, you get that perfect sweet-salty balance in every bite.
They’re rolled into one-inch balls (because who has time for measuring cups?) and kept in the fridge for grab-and-go energy. Think of them as the snack version of your favorite cozy hoodie—easy, comforting, and always there when you need it. These bites are ideal for pre-workout fuel, afternoon pick-me-ups, or keeping the hangry monster at bay between meals.
Reasons to Try Salted Caramel Protein Balls
First off, they taste amazing. You know how some protein snacks taste like sadness wrapped in chalk? Not these. Salted Caramel Protein Balls are sweet, nutty, a little chewy, and just salty enough to make the flavor pop. They’re also a great way to sneak in more protein—especially if you’re chasing fitness goals, trying to survive the 3 p.m. crash, or just trying to keep snacks interesting.
They’re super easy to make (we’re talking 10 minutes, max), and require no baking, no fancy tools, and no weird ingredients. Plus, they’re naturally gluten-free and vegan, so they work for most dietary lifestyles. And if you’re trying to cut down on added sugar, these bites get all their sweetness from dates—nature’s original caramel. Whether you’re prepping for the week or need something snacky but smart, this recipe is a no-brainer.
Ingredients Needed to Make Salted Caramel Protein Balls
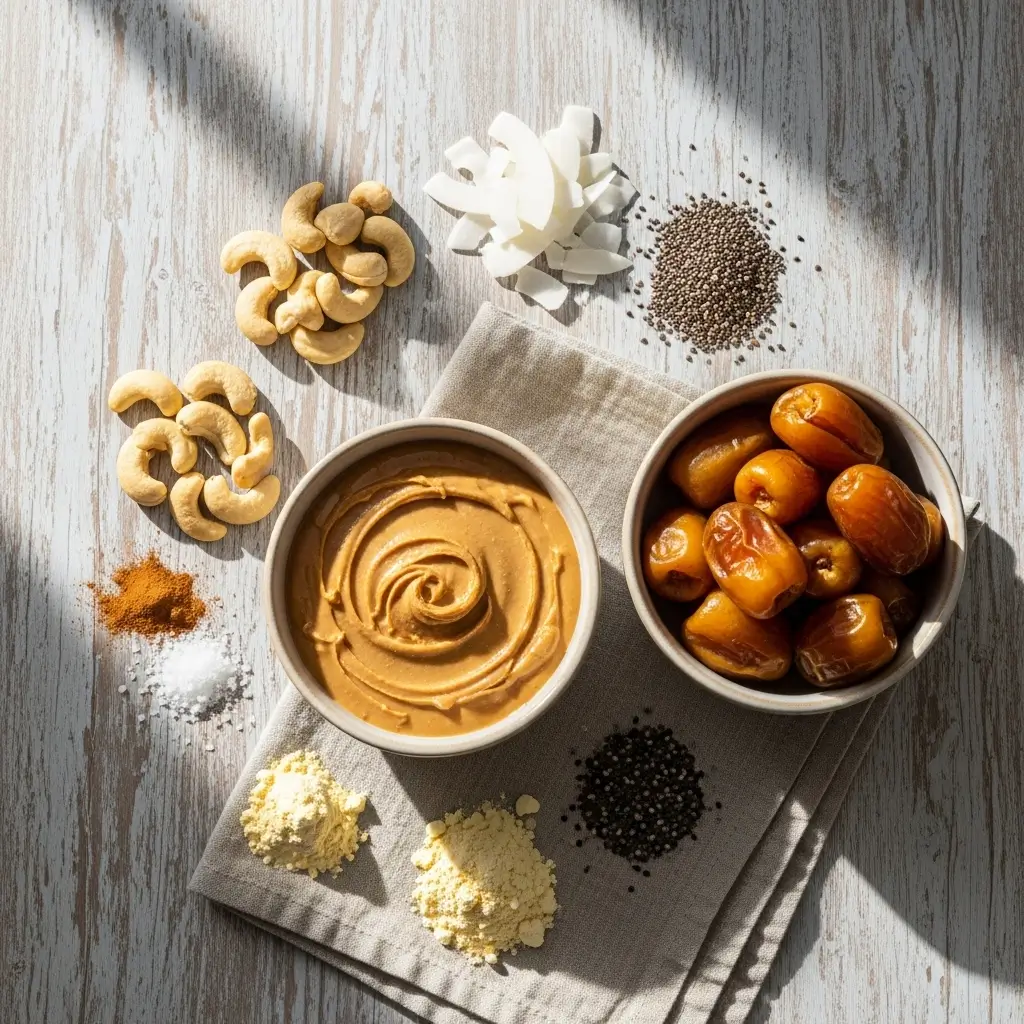
- 1 cup raw or roasted unsalted cashews
- 1 cup pitted Medjool dates (about 8)
- ½ cup unsweetened coconut flakes
- ½ cup vanilla protein powder (whey, pea, soy, rice, hemp, etc.)
- 2 tablespoons chia, hemp, or ground flax seeds
- 2 tablespoons peanut butter
- 3 tablespoons vanilla almond milk or water
- ¼ teaspoon sea salt
- 1 teaspoon cinnamon
Instructions to Make Salted Caramel Protein Balls
Making Salted Caramel Protein Balls at home is refreshingly simple—and with this detailed step-by-step guide, you’ll have a batch of nutritious bites ready in just minutes. Whether you’re a seasoned meal prepper or a first-timer, these instructions break it all down so you can confidently create this no-bake snack that tastes like dessert. Follow this step-by-step method to get the perfect texture, flavor, and convenience you’re looking for.
Step 1: Prepare Your Ingredients and Tools
Before you start blending, gather everything you need. That includes your ingredients: cashews, Medjool dates, coconut flakes, vanilla protein powder, chia seeds (or your favorite alternative), peanut butter, almond milk, sea salt, and cinnamon. You’ll also need a reliable food processor or a high-powered blender like a Vitamix. For easier cleanup and smoother prep, line your counter with parchment paper and have a container ready for storing the finished balls. If you’re missing something, check out our guide on ingredient swaps for protein balls—you might already have a perfect substitute in your pantry!
Step 2: Blend the Cashews and Dates
In your food processor, add the cashews and pitted Medjool dates. Pulse the mixture in short bursts until the texture becomes crumbly and slightly sticky. The goal in this step-by-step phase is to break them down without turning them into a paste—think coarse granola, not nut butter. If your dates are a little dry, soak them in warm water for 5–10 minutes beforehand and drain well. This little trick will help create a smoother, more pliable base. For more prep tricks like this, see our quick snack preparation tips.
Step 3: Add Remaining Ingredients
Now it’s time to turn your base into a dough. Add the coconut flakes, protein powder, chia seeds, peanut butter, cinnamon, almond milk (or water), and sea salt to the food processor. Blend again for 1 to 2 minutes. This step-by-step part is key to getting the right consistency—smooth enough to stick together, but still textured. If the mixture looks dry or crumbly, add one extra tablespoon of almond milk at a time until it comes together. On the flip side, if it feels too wet, sprinkle in a bit more protein powder or coconut flakes to firm it up.
Step 4: Test the Dough for Texture
Pause your blending and scoop out a small amount of the mixture with your fingers. Try rolling it into a ball. If it holds its shape without cracking or sticking too much to your hands, you’re right on track. This testing step-by-step helps prevent frustration when you’re rolling out the full batch. If the dough sticks to your hands like glue, lightly dampen your palms or chill the dough for 10 minutes before shaping.
Step 5: Roll into Bite-Sized Balls
Using a tablespoon or small cookie scoop, portion out the dough and roll it between your palms into 1-inch balls. You should end up with around 18 bites. Don’t worry if they’re not perfectly round—homemade charm is always in style. If you want to make these bites kid-friendly or party-ready, try rolling them in extra coconut flakes or a pinch of cinnamon sugar for a fun finish. For a festive twist, check out our seasonal protein ball ideas for flavor pairings that match the time of year.
Step 6: Store and Chill
Transfer your Salted Caramel Protein Balls into an airtight container. They’re ready to eat immediately, but chilling them in the fridge for 30 minutes helps firm up their texture and deepen the flavors. Store in the fridge for up to 1 week, or keep them in the freezer for up to 3 months. They thaw quickly—perfect for when you need a grab-and-go energy boost that doesn’t require a microwave or a spoon.
This step-by-step recipe makes it incredibly easy to create a healthy, sweet, and satisfying snack right at home. Want to try a few flavor variations? Explore our other high-protein snack recipes to keep your snack game strong all week long.
By following this clear and friendly step-by-step process, you’ll have foolproof Salted Caramel Protein Balls that are just as satisfying as they are nutritious—without any of the stress.
What to Serve with Salted Caramel Protein Balls
While these bites are perfect all on their own, you can definitely serve them with a little flair. They pair beautifully with a warm mug of chai or a creamy cold brew for that coffeehouse vibe at home. Want to go full snack board? Add some apple slices, a handful of almonds, and a square of dark chocolate for a DIY protein-packed snack plate.
These also work great as a sidekick to breakfast—toss a couple on the side of your smoothie bowl or oatmeal for extra staying power. If you’re hosting brunch or doing a casual potluck, they’re a hit with both the health nuts and the sweet tooth crowd. Bonus: they’re kid-approved (hello, school lunchbox hero). For savory balance, pair them with a bite-sized protein dish like these cowboy chicken bites or honey BBQ chicken rice.
Key Tips for Making Salted Caramel Protein Balls
- Use soft Medjool dates. If yours are a little dry, soak them in warm water for 10 minutes first.
- Customize the protein. Use your favorite vanilla protein powder—whey, pea, soy, collagen—whatever fits your vibe.
- Keep them cold. They hold their shape better and taste fresher when stored in the fridge.
- Double batch it. These freeze like a dream. Make a big batch and thank yourself later.
- Mix it up. Swap cashews for almonds, coconut for oats, or peanut butter for almond butter. You do you.
- Mess-free hands. Lightly wet your palms before rolling to keep the dough from sticking.
Storage and Reheating Tips Salted Caramel Protein Balls
These protein bites are built for batch prep. Store them in an airtight container in the fridge and they’ll stay fresh for up to a week. If you want to keep them longer, stash them in the freezer for up to 3 months. Just pop a few out and let them thaw for about 10 minutes on the counter before eating.
If you like them cold (like cookie dough from the fridge—don’t pretend you haven’t), go ahead and eat them straight from the freezer. There’s no need to reheat, but if you’re feeling fancy, a very quick zap in the microwave—like 5 seconds—can soften them up for a gooier, melty texture. They’re a no-fuss snack, which is exactly what makes them perfect for hectic mornings or after-school hunger attacks.
FAQs
Are these actually healthy?
Yup! They’re naturally sweetened with dates, full of healthy fats, protein, and fiber. A great choice for a guilt-free snack.
Can I make them nut-free?
Absolutely. Swap cashews for sunflower seeds and use sunflower seed butter instead of peanut butter.
What kind of protein powder works best?
Any vanilla-flavored protein powder will do—just pick one you like the taste of. Plant-based or whey both work here.
Do they need to stay refrigerated?
Yes! They’ll be soft and fresh for a week in the fridge. You can freeze extras to keep them even longer.
Can kids eat these?
Definitely. They’re a great snack for lunchboxes, after-school fuel, or just sneaky dessert alternatives.
Final Thoughts
Salted Caramel Protein Balls are your snack-time MVPs—quick, healthy, and packed with flavor that hits the spot every single time. Whether you need an afternoon boost, something sweet post-gym, or a smarter option to quiet the 9 p.m. cravings, these little bites have your back. And the best part? You can whip them up in less time than it takes to scroll through your Instagram feed. If you’re craving more quick and satisfying ideas, check out our easy 15-minute lo mein or these air fryer buttery parmesan garlic wings for savory cravings. Make a batch, pop ‘em in the fridge, and snack smarter this week.
Visit our Pinterest for regular slow cooker recipe updates, or join our Facebook discussions where cooking fans exchange their favorite hearty meal ideas.
PrintSalted Caramel Protein Balls: Quick, Healthy Snack Recipe

Salted caramel protein energy bites make the perfect energizing pick me up. They are naturally gluten-free, vegan, and have no added sugars!
- Prep Time: 10 minutes
- Cook Time: 0 minutes
- Total Time: 10 minutes
- Yield: 18 bites
- Category: Snack
- Method: No-Bake
- Cuisine: American
- Diet: Vegan
Ingredients
- 1 cup raw or roasted cashews, unsalted
- 1 cup pitted Medjool dates, about 8 dates
- 1/2 cup unsweetened coconut flakes
- 1/2 cup vanilla protein powder of your choice (whey, pea, soy, rice, hemp, egg white, casein, collagen, brown rice, etc)
- 2 tablespoons seeds of your choice (hemp seeds, chia seeds, or ground flax seed)
- 2 tablespoons peanut butter
- 3 tablespoons vanilla almond milk or water
- 1/4 teaspoon sea salt
- 1 teaspoon cinnamon
Instructions
1. In a food processor or Vitamix, blend cashews and dates until mostly broken down into a crumbly consistency.
2. Add the rest of the ingredients and blend until mostly smooth, about 1-2 minutes.
3. Roll into 1-inch bites. Store in the fridge for up to 1 week or freezer for up to 3 months.
Notes
I often like to make a double batch of these energy bites to freeze. Then, I will take them out a few at a time to thaw for a quick snack that’s already ready to go!