No-Bake Grinch Mousse Pie is here to save your holiday sanity and bring a big ol’ grin to your dessert table. If you’re juggling shopping lists, school events, and a string of office parties that never end, this ridiculously fun and festive pie is like a holiday miracle in a dish. It’s got a vibrant Grinch-green mousse, a bold red cookie crust, and just the right sprinkle of Whoville charm.
And here’s the real kicker—it’s totally no-bake. That means no oven, no stress, and absolutely no chance of burning the pie while you’re untangling Christmas lights for the third time this week. The best part? You can make it ahead, pop it in the fridge, and serve up something that’s equal parts adorable and delicious.
Table of Contents
What is No-Bake Grinch Mousse Pie?
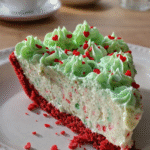
No-Bake Grinch Mousse Pie is a whimsical holiday dessert that’s as fun to make as it is to eat. It starts with a crumbly, buttery red cookie crust—think red velvet Oreos or any festive sandwich cookie you love. That’s topped with a fluffy, creamy mousse dyed a bright Grinchy green (don’t worry, we’ll guide you on getting that perfect hue). The mousse is a dreamy combo of cream cheese, whipped topping, and whipped heavy cream.
Sprinkles—heart-shaped, of course—get folded in to bring the Grinch’s transformation to life, one joyful bite at a time. The crowning touch is piped green whipped topping and extra red hearts that scream “Merry and mischievous.” No oven, no fancy tools, just a fridge, a mixer, and your holiday spirit.
Reasons to Try No-Bake Grinch Mousse Pie
There are a bunch of reasons to add this No-Bake Grinch Mousse Pie to your holiday dessert game plan. First, it’s no-bake—so your oven stays free for the turkey, stuffing, or let’s be real, reheating takeout. Second, it’s fast. You’ll have this whipped up in 15 minutes flat (plus chill time). That’s less than one episode of your favorite cheesy holiday rom-com.
Third, it’s the kind of dessert that makes people smile. It’s kid-friendly, potluck-approved, and looks like you put in way more effort than you did. And for all you busy parents, picky eaters, or folks who just don’t have the energy for a full-blown baking session, this pie delivers big holiday cheer with minimal effort. Bonus: it’s make-ahead magic.
Ingredients Needed to Make No-Bake Grinch Mousse Pie
Red Cookie Crust:
- 2 cups red cookie crumbs (like red velvet Oreos, minus the filling)
- 5 tablespoons melted butter
Grinch Mousse Filling:
- 8 oz cream cheese, softened
- 1 cup powdered sugar
- 1 teaspoon vanilla extract
- 1 cup whipped topping (Cool Whip)
- 1 cup heavy cream, whipped to soft peaks
- ½ cup small red heart sprinkles
- ¼ cup green nonpareils or sprinkles
Grinch Green Piped Topping:
- 1½ cups whipped topping or stabilized whipped cream
- 2–3 drops neon green gel food coloring
- 1–2 drops regular green gel dye
- Extra red heart sprinkles (small and medium)
Instructions to Make No-Bake Grinch Mousse Pie
Making this festive dessert is easier than stealing Christmas — just follow this step-by-step guide to bring your own No-Bake Grinch Mousse Pie to life. Whether you’re a seasoned home baker or barely surviving on coffee and holiday cheer, these detailed directions will walk you through each stage with ease. Bonus: You’ll find helpful internal links to ingredient swaps and smart kitchen tricks along the way.
Step 1: Make the Red Cookie Crust
Start your step-by-step journey by building the foundation—literally. Place about two cups of red cookies (think red velvet Oreos or red holiday sandwich cookies) in a food processor and pulse until they become fine crumbs. No processor? No problem. Toss them in a zip-top bag and crush with a rolling pin—perfect stress relief, if you ask us.
Pour the crumbs into a mixing bowl and stir in 5 tablespoons of melted butter until everything’s coated and the texture resembles wet sand. Press the mixture firmly into a 9-inch pie dish, using the back of a spoon or your fingers to create an even layer on the bottom and slightly up the sides. Once the crust is formed, place it in the fridge to chill while you move on. This keeps it firm and ready to hold the creamy filling. If you’re curious about other creative crust ideas, check out our cheesy quinoa and black bean taco skillet for more bold base inspiration.
Step 2: Prepare the Grinch Mousse Base
In this step-by-step portion, we’re making the creamy green magic. Grab a large bowl and beat 8 oz of softened cream cheese until it’s smooth and fluffy. (Room temperature cream cheese makes your life much easier here.)
Next, add 1 cup of powdered sugar and 1 teaspoon of vanilla extract. Continue beating until everything is well combined and silky. Now, fold in 1 cup of whipped topping (like Cool Whip) using a spatula or spoon—be gentle, you’re not looking to deflate the fluff.
Separately, whip 1 cup of heavy cream until soft peaks form. This means when you lift the beaters, the cream should gently hold its shape. Carefully fold the whipped cream into the mousse mixture. This is where the texture transforms from creamy to airy, giving it that irresistible mousse consistency. If you want to know more about the difference between soft and stiff peaks, we go into detail in our simple and comforting chicken noodle soup post, which also includes pro prep tips.
Step 3: Add the Festive Sprinkles
Now for the fun, festive part of this step-by-step recipe. Add in ½ cup of small red heart sprinkles and ¼ cup of green nonpareils. These mix-ins not only add adorable pops of color but bring in that signature “Grinch stole my heart” vibe.
Stir gently until everything is evenly combined. Then, pour the mousse filling into your chilled red cookie crust. Use a spatula to smooth the top so it looks clean and picture-perfect. If you’re prepping for a party, this is the point where it starts looking seriously impressive with minimal effort.
Step 4: Chill the Pie
This step-by-step stage is all about patience (the hardest part, we know). Cover the pie lightly with plastic wrap and refrigerate for at least 4 hours, but overnight is best. Letting the pie sit ensures the mousse sets properly and slices beautifully. If you’re on a tight schedule, this pie is the ideal make-ahead dessert. While it’s chilling, you can prep other dishes like this classic homemade chicken noodle soup to round out your meal.
Step 5: Make the Grinch Green Piped Topping
Once your pie is firm and chilled, it’s time to whip up the bright green topping. This step-by-step part brings that eye-catching finish that makes people stop and say, “Wait, did you make that?!”
In a small bowl, combine 1½ cups of whipped topping with 2–3 drops of neon green gel food coloring and 1–2 drops of regular green gel dye. Mix gently until you reach that perfect Grinchy-green color. Pro tip: always use gel food coloring instead of liquid—liquid can mess with the texture. Need a backup topping idea? Our crockpot garlic parmesan chicken pasta article touches on stabilizing sauces and toppings that hold up like a dream.
Transfer the green topping to a piping bag fitted with a star tip and pipe tall, playful swirls around the edges of your pie. No piping bag? A zip-top bag with the corner snipped off works just fine.
Step 6: Decorate Like You’re in Whoville
The final step-by-step flourish: decorations. Sprinkle on more red heart sprinkles—use a mix of small and medium sizes to echo that iconic “heart grew three sizes” look. This step is totally optional, but honestly, why stop now?
Step 7: Slice and Serve
Ready to impress? Dip a sharp knife in hot water, dry it off, and make your first slice. This step-by-step trick helps you get those clean, bakery-style cuts. Serve your pie chilled and watch as guests go from curious to totally obsessed. Pair it with hot cocoa or a holiday punch, and you’ve got yourself a new December tradition.
What to Serve with No-Bake Grinch Mousse Pie
This pie is already a showstopper, but if you’re going for a full-on holiday dessert table, you can pair it with hot cocoa, mulled cider, or even a festive holiday punch. It also goes surprisingly well with salty snacks like spiced nuts or popcorn mixes if you’re hosting a casual gathering. And if you’ve got leftovers (doubtful, but still), try a slice with a morning coffee the next day—you deserve it. Want more holiday dessert ideas? Check out this creamy dill pierogi soup for something savory to balance all the sweetness.
Key Tips for Making No-Bake Grinch Mousse Pie
For the brightest green color, always use gel food coloring—not the liquid stuff. Liquid dye can mess with the texture and make your mousse sad and watery. Chill your crust well before adding the filling for a sturdy base. Let the pie set overnight if you can—it slices like a dream that way. Want extra stability? Swap Cool Whip with stabilized whipped cream. And don’t forget: red heart sprinkles come in different sizes, so mix it up for that adorable “Grinch’s heart grew three sizes” look. Oh, and use a hot knife to slice—it makes a world of difference.
Storage and Reheating Tips for No-Bake Grinch Mousse Pie
Storage is a breeze. Cover the pie tightly with plastic wrap or foil and keep it in the fridge for up to 3 days. The mousse holds its shape well, but the sprinkles may bleed a little over time—just something to keep in mind if you’re prepping way in advance. This pie does not freeze well (whipped toppings get weird after thawing), so stick to the fridge. No need for reheating—this is a chill-and-serve kind of dessert. If you’re looking for another make-ahead winner, try this chicken noodle casserole for your next cozy night in.
FAQs
Can I use a store-bought crust?
Totally! A premade graham cracker crust works if you’re in a pinch, but that red cookie crust gives it serious holiday vibes.
Can I make this ahead of time?
Yes! In fact, it tastes even better after a night in the fridge.
Do I have to use Cool Whip?
Nope. Stabilized whipped cream works great and tastes more homemade.
How do I get that perfect green color?
Use neon green gel food coloring with a drop or two of regular green to balance it out. It’s Grinch perfection.
Are the heart sprinkles necessary?
Are candy canes necessary on a Christmas tree? Technically no, but also… yes.
Final Thoughts
No-Bake Grinch Mousse Pie is the kind of dessert that steals the spotlight—and maybe a few hearts along the way. It’s colorful, quirky, and easy enough to make while wrangling kids, holiday chaos, or your fifth coffee of the day. With a bold cookie crust and that unmistakable Grinch-green mousse, it checks every box for a crowd-pleasing, conversation-starting treat. And if you’re looking to impress without the stress, this pie’s got your back. For more fun recipes and holiday-ready dishes, wander over to CookingWithRamsay.com and get inspired.
Visit our Pinterest for regular slow cooker recipe updates, or join our Facebook discussions where cooking fans exchange their favorite hearty meal ideas.
PrintEasy No-Bake Grinch Mousse Pie for the Holidays
💚🎄 A festive, fluffy Grinch-green mousse pie with a bold red cookie crust and adorable heart sprinkles — fun, creamy, and guaranteed to steal the show at any holiday gathering! ✨
- Prep Time: 15 minutes
- Total Time: 4 hours 30 minutes
- Yield: 1 pie (8 slices)
- Category: Dessert
- Method: No-Bake
- Cuisine: American
Ingredients
- Red Cookie Crust
- 2 cups red cookie crumbs (red velvet Oreos without filling or any red sandwich cookie)
- 5 tablespoons melted butter
Grinch Mousse Filling
- 8 oz cream cheese, softened
- 1 cup powdered sugar
- 1 teaspoon vanilla extract
- 1 cup whipped topping (Cool Whip)
- 1 cup heavy cream, whipped to soft peaks
- ½ cup small red heart sprinkles
- ¼ cup green nonpareils or green sprinkles
Grinch Green Piped Topping
- 1½ cups whipped topping or stabilized whipped cream
- 2–3 drops neon green gel food coloring
- 1–2 drops regular green gel dye
- Extra red heart sprinkles
Instructions
1. Crush the red cookies into fine crumbs, mix with melted butter, and press firmly into a pie dish. Chill to set.
2. Beat cream cheese until smooth and fluffy. Add powdered sugar and vanilla. Fold in Cool Whip, then fold in whipped heavy cream to create a thick mousse.
3. Stir in red heart sprinkles and green nonpareils. Spread the mousse evenly into the chilled crust.
4. Refrigerate until the mousse is firm enough to slice cleanly. Overnight is ideal.
5. Tint whipped topping with neon and regular green gel coloring until it becomes bright Grinch-green. Pipe tall swirls on top.
6. Add extra small and medium red heart sprinkles for that perfect Whoville touch.
7. Use a hot knife for clean edges. Serve chilled and enjoy!
Notes
For the brightest Grinch-green color, always use gel food coloring, not liquid.
Chill the pie overnight for the cleanest slices and firmest mousse texture.
You can swap Cool Whip with stabilized whipped cream for a richer, homemade flavor.
Use red heart sprinkles of mixed sizes to match the iconic Grinch look.
Store leftovers in the refrigerator for up to 3 days.