Classic Stuffed Peppers are one of those weeknight wonders that just hit the spot. Whether you’re feeding a hungry crew after soccer practice or trying to clean out the fridge in a delicious way, these savory beauties check all the boxes. They’re hearty, super satisfying, and taste like home—like something your grandma might’ve made, but without the five-hour prep time.
With a rich tomato base, gooey cheese topping, and a flavorful meat-and-rice filling tucked inside sweet roasted bell peppers, it’s no wonder why classic stuffed peppers have stood the test of time. Midway through, you’ll realize these are perfect for picky eaters (just call them “pepper bowls”) and flexible enough for any diet. Best part? You can prep ’em ahead or freeze ’em for later. So grab those peppers from the fridge—you’re about to make dinner magic.
Table of Contents
What is Classic Stuffed Peppers?
Classic stuffed peppers are a cozy American twist on a dish with deep roots across many cultures—from Greek yemista to Mexican chiles rellenos. But the version we’re diving into today keeps it familiar and comforting. It’s all about hollowed-out bell peppers that get filled with a savory mixture of ground beef, rice, onions, garlic, and tomatoes, then topped with melty cheese and baked to bubbly perfection.
This isn’t one of those fussy meals with ingredients you’ll only use once. It’s simple, practical, and soul-satisfying. And the beauty of it? It adapts to what you’ve got in the pantry or freezer. Add in your favorite herbs, swap out the protein, or even go vegetarian. These peppers are little edible bowls of comfort—and you’ll find yourself coming back to them again and again.
Reasons to Try Classic Stuffed Peppers
Let’s be real: dinner needs to pull its weight. Classic stuffed peppers do exactly that. First off, they’re a full meal in one tidy, colorful package—protein, veggies, and carbs all wrapped into a pepper shell. Second, they’re ridiculously customizable. Got leftover taco meat? Toss it in. Cooking for a vegetarian? Use lentils or a plant-based crumble.
They’re also freezer-friendly and reheat like a dream—hello, future lazy dinner wins. If you’ve got picky kids, let them pick their pepper color (seriously, it works). And if you’re trying to cut down on waste, this recipe is perfect for using up random fridge ingredients. Plus, it’s hard not to feel a little proud when you pull out a baking dish full of these golden, cheesy, piping-hot peppers. You’ll feel like a weeknight rockstar.
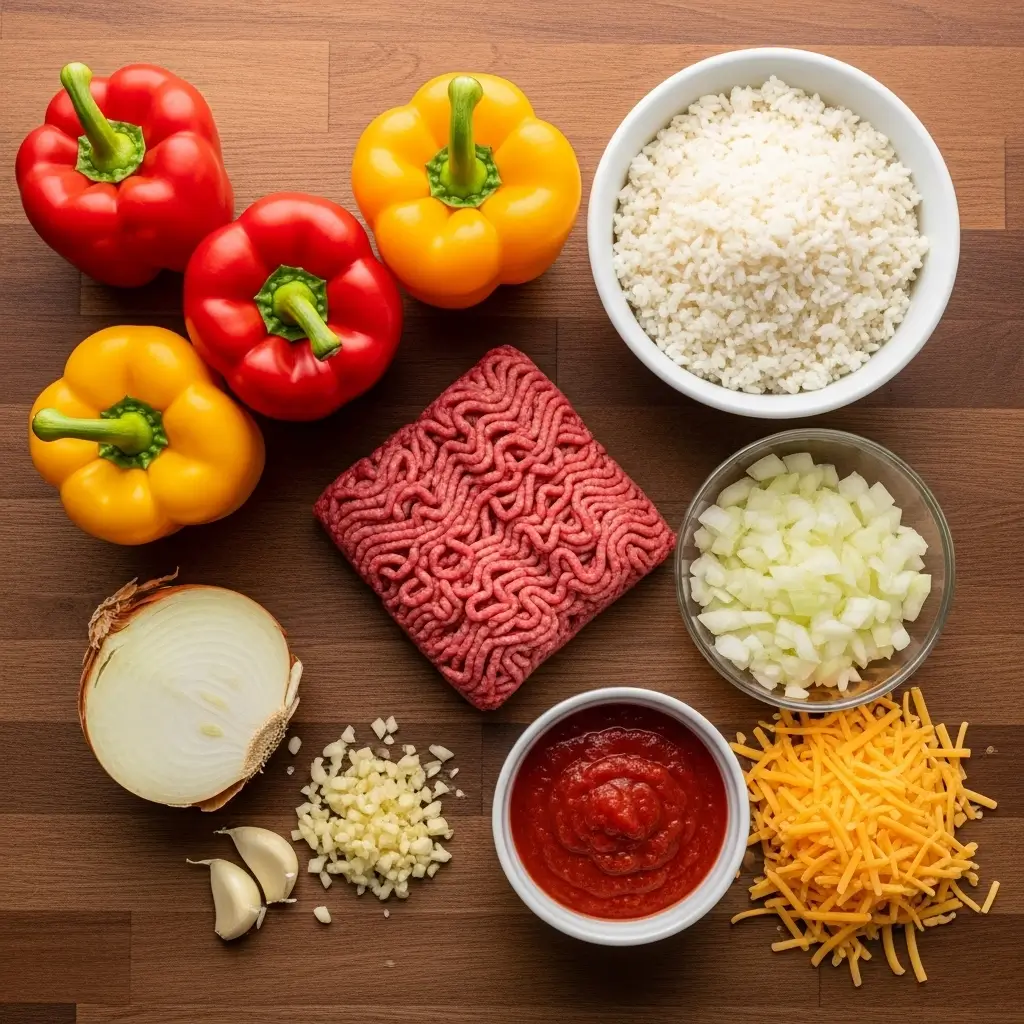
Ingredients Needed to Make Classic Stuffed Peppers
- 4 whole bell peppers (any color you like—mix it up!)
- 1 lb ground beef (or turkey, chicken, or plant-based alternative)
- 1 cup cooked rice (white, brown, or even cauliflower rice)
- 1 medium onion, finely chopped
- 2 cloves garlic, minced
- 1 cup tomato sauce (or crushed tomatoes if you like it chunky)
- 1 cup diced tomatoes (drained well)
- 1 tbsp Italian seasoning (or a blend of oregano and basil)
- Salt and black pepper to taste
- 1 cup shredded mozzarella cheese
- 1/4 cup grated Parmesan cheese
- 1 tbsp olive oil
- 1/4 cup chopped fresh parsley (for garnish)
Instructions to Make Classic Stuffed Peppers
Follow this detailed step-by-step guide to create classic stuffed peppers that are comforting, cheesy, and absolutely satisfying. Whether you’re a seasoned home cook or just trying to get dinner on the table between work calls, this method breaks it down into easy-to-follow steps that deliver delicious results every single time.
Step 1: Prepare the Bell Peppers
Start by choosing four whole bell peppers—any color works, but red and yellow tend to be the sweetest. Wash them under cool water, then carefully slice off the tops about an inch below the stem. These tops can be saved and used later as cute edible “lids.”
Next, use a spoon to gently remove the seeds and white membranes inside each pepper. Try to keep the peppers intact so they hold the filling nicely. If your peppers don’t stand up straight, you can slice a thin layer off the bottom (just be careful not to create a hole).
Pro Tip: If you prefer a softer pepper texture, blanch them in boiling water for 2–3 minutes. Then immediately transfer them to an ice bath. This quick prep step helps tenderize the peppers before baking.
Want more prep advice? Check out our easy stuffed bell peppers for extra pepper-handling tips.
Step 2: Sauté the Aromatics and Brown the Meat
Heat 1 tablespoon of olive oil in a large skillet over medium heat. Once the oil shimmers, add 1 finely chopped onion and sauté for about 5–7 minutes. You’re aiming for a soft, golden onion that adds natural sweetness to your filling.
Toss in 2 minced garlic cloves and stir for another 30 seconds to a minute. Be careful here—garlic burns quickly and turns bitter fast.
Add 1 pound of ground beef (or turkey, chicken, or a plant-based alternative) to the pan. Break it up with your spatula and cook until the meat is browned and fully cooked, about 7–10 minutes. Drain off any excess fat to keep your filling from getting greasy.
Helpful Link: Looking for a lighter version? Try these healthy ground turkey recipes that work perfectly as swaps in this step-by-step method.
Step 3: Build the Filling (Flavor Time!)
Once your meat is browned, it’s time to pack in that comforting flavor. Stir in 1 cup of tomato sauce (or crushed tomatoes for more texture) and 1 cup of drained diced tomatoes. These add moisture and richness to the mix.
Sprinkle in 1 tablespoon of Italian seasoning, and season generously with salt and black pepper to taste. Give everything a good stir and let the mixture simmer on low heat for 5–10 minutes. This step-by-step simmering lets the flavors meld beautifully.
Now, stir in 1 cup of cooked rice—white, brown, or even cauliflower rice if you’re cutting carbs. The rice will absorb the saucy goodness and bind everything together.
Try This: If you love rice-based dishes, our chicken fajita casserole is another weeknight winner that follows a similar prep flow.
Step 4: Stuff the Peppers
Preheat your oven to 375°F (190°C). Get your baking dish ready—one with high sides works best.
Stand the cleaned peppers upright in the dish and spoon the beef and rice mixture into each one. Don’t be afraid to pack them tightly and even slightly mound the filling over the top. They’ll settle as they bake.
For extra moisture during baking, pour a little water or extra tomato sauce (about 1/4 cup) into the bottom of the dish. This step keeps the peppers from drying out and makes cleanup easier too.
Bonus Tip: If you have extra filling, it’s delicious scooped alongside the baked peppers or saved for a quick lunch.
Step 5: Bake Covered
Cover the baking dish tightly with aluminum foil. This creates a steamy environment that helps the peppers cook evenly and stay juicy.
Place the dish in your preheated oven and bake for 30–40 minutes. You’ll know the peppers are ready when they’re tender enough to pierce with a fork but still hold their shape.
Need a side dish to bake alongside? Try these cheesy garlic bread sloppy joe melts for a crave-worthy, carb-friendly pairing.
Step 6: Add the Cheese and Bake Again
Once the peppers are tender, remove the foil and sprinkle the tops generously with 1 cup shredded mozzarella and 1/4 cup grated Parmesan. Return the dish to the oven uncovered and bake for another 10–15 minutes, or until the cheese is bubbly, golden, and irresistible.
If you saved the pepper tops from earlier, now’s the time to place them back on for that restaurant-worthy presentation.
Step 7: Rest, Garnish, and Serve
After removing the dish from the oven, let the peppers sit for 5–10 minutes. This step allows the filling to set slightly, so it holds together beautifully when sliced or scooped.
Top each pepper with a sprinkle of fresh chopped parsley for color and brightness. Serve warm and get ready for happy faces around the table.
Want a similar step-by-step dinner that’s just as comforting? Don’t miss our homemade chicken and rice casserole—another perfect make-ahead option.
What to Serve with Classic Stuffed Peppers
Classic stuffed peppers are basically a whole meal on their own, but if you want to make it a dinner to remember, pair them with a side that complements their bold, savory flavors. A crisp green salad with a tangy vinaigrette is a fresh contrast to the rich filling. Want something warm? Try homemade cheesy garlic bread sloppy joe melts or roasted veggies tossed with olive oil and herbs. You can even go simple with buttered noodles or mashed potatoes (because carbs are life). And if you’re watching carbs, roasted cauliflower or a light soup on the side will keep things balanced without feeling like diet food.
Key Tips for Making Classic Stuffed Peppers
- Use leftover rice. Day-old rice holds up better and doesn’t get mushy.
- Mix up proteins. Ground turkey, chicken, or even lentils work great.
- Drain the tomatoes. Otherwise, the filling gets too watery.
- Pre-cook the peppers if you want softer results. A quick blanch helps.
- Make it cheesy. Don’t be shy with the cheese—both inside and on top.
- Bake with moisture. A bit of water or sauce in the baking dish keeps them from drying out.
- Season to taste. Taste your filling before stuffing—this is your flavor moment.
- Double the recipe. These freeze beautifully for meal prep magic.
Storage and Reheating Tips Classic Stuffed Peppers
Got leftovers? Lucky you. Store classic stuffed peppers in an airtight container in the fridge for up to 4 days. To freeze, wrap each cooked pepper in plastic wrap, then foil, and store in a freezer bag. They’ll keep well for about 2-3 months. To reheat from the fridge, microwave for 2-3 minutes or bake at 350°F for 15-20 minutes. From frozen, thaw overnight in the fridge or bake straight from frozen at 375°F for about 40 minutes, covered, then uncover to melt the cheese.
FAQs
Can I make these vegetarian?
Absolutely. Swap the meat with lentils, quinoa, or a plant-based crumble.
What’s the best rice to use?
Honestly, whatever’s already cooked in your fridge. Brown, white, even cauliflower rice works.
Can I prep these ahead?
Yes! Stuff the peppers and refrigerate up to a day ahead. Bake when ready.
What if I don’t like bell peppers?
Try hollowed-out zucchinis or poblano peppers for a twist.
Can I freeze them before baking?
You bet. Just skip the cheese, freeze, and bake when ready—add cheese near the end.
Final Thoughts
If comfort food had a poster child, classic stuffed peppers would be on it. They’re nostalgic, budget-friendly, and endlessly flexible. Whether you’re feeding a hungry family or stocking the freezer, this is a dinner that delivers every time. Want more cozy favorites? Check out our chicken fajita casserole or 35-minute ground chicken and rice with veggies for more mealtime wins. Stuffed peppers may seem old-school, but one bite and you’ll remember exactly why they’re still a classic.
Visit our Pinterest for regular slow cooker recipe updates, or join our Facebook discussions where cooking fans exchange their favorite hearty meal ideas.
PrintClassic Stuffed Peppers – Easy, Reliable, Family Favorite

Classic Stuffed Peppers are a hearty and comforting dish made with tender bell peppers filled with savory ground beef, rice, and herbs, then topped with melty cheese for a cozy homemade dinner delight.
- Prep Time: 25 minutes
- Cook Time: 50 minutes
- Total Time: 1 hour 15 minutes
- Yield: 4 servings
- Category: Main Course
- Method: Baked
- Cuisine: American
Ingredients
- 4 whole Bell Peppers (you can substitute with poblanos or zucchini for a different flavor profile)
- 1 pound Ground Beef (can be replaced with ground turkey, chicken, or a plant-based alternative if you prefer)
- 1 cup Cooked Rice (white, brown, or cauliflower rice all work wonderfully)
- 1 medium Onion (finely chopped)
- 2 cloves Garlic (minced)
- 1 cup Tomato Sauce (or crushed tomatoes for a chunkier texture)
- 1 cup Diced Tomatoes (drained to prevent excess moisture)
- 1 tablespoon Italian Seasoning (or a mix of individual herbs like oregano and basil)
- Salt (to taste)
- Black Pepper (to taste)
- 1 cup Mozzarella Cheese (or cheddar, shredded)
- 1/4 cup Parmesan Cheese (finely grated)
- 1 tablespoon Olive Oil (or vegetable/canola oil)
- 1/4 cup Fresh Parsley (for garnish, chopped)
Instructions
1. Wash the bell peppers, slice off the tops, and remove seeds and membranes. Reserve tops if desired.
2. Optional: Blanch peppers in boiling water for a few minutes to slightly soften. Set aside.
3. Heat olive oil in a large skillet over medium heat. Add chopped onion and sauté until soft, about 5-7 minutes. Add minced garlic and cook for 1 minute.
4. Add ground beef and cook until browned. Drain excess fat.
5. Stir in tomato sauce, diced tomatoes, Italian seasoning, salt, and pepper. Simmer for 5-10 minutes. Adjust seasoning to taste.
6. Add cooked rice to the skillet and mix until fully combined with the beef mixture.
7. Preheat oven to 375°F (190°C). Fill each prepared pepper with the meat and rice mixture. Place upright in a baking dish.
8. Optional: Add a splash of tomato sauce or water to the bottom of the baking dish. Cover tightly with foil.
9. Bake covered for 30-40 minutes, until peppers are tender.
10. Remove foil, top with mozzarella and Parmesan. Bake uncovered for another 10-15 minutes until cheese is melted and golden.
11. Let rest for a few minutes. Garnish with chopped parsley and serve hot.
Notes
You can swap bell peppers for poblanos or even hollowed-out zucchini for a twist.
Blanching the peppers before stuffing makes them more tender after baking.
For a vegetarian version, use plant-based meat or sautéed mushrooms.
Add red pepper flakes for a spicy kick or extra herbs for freshness.
These can be prepped ahead and refrigerated before baking for an easy make-ahead meal.