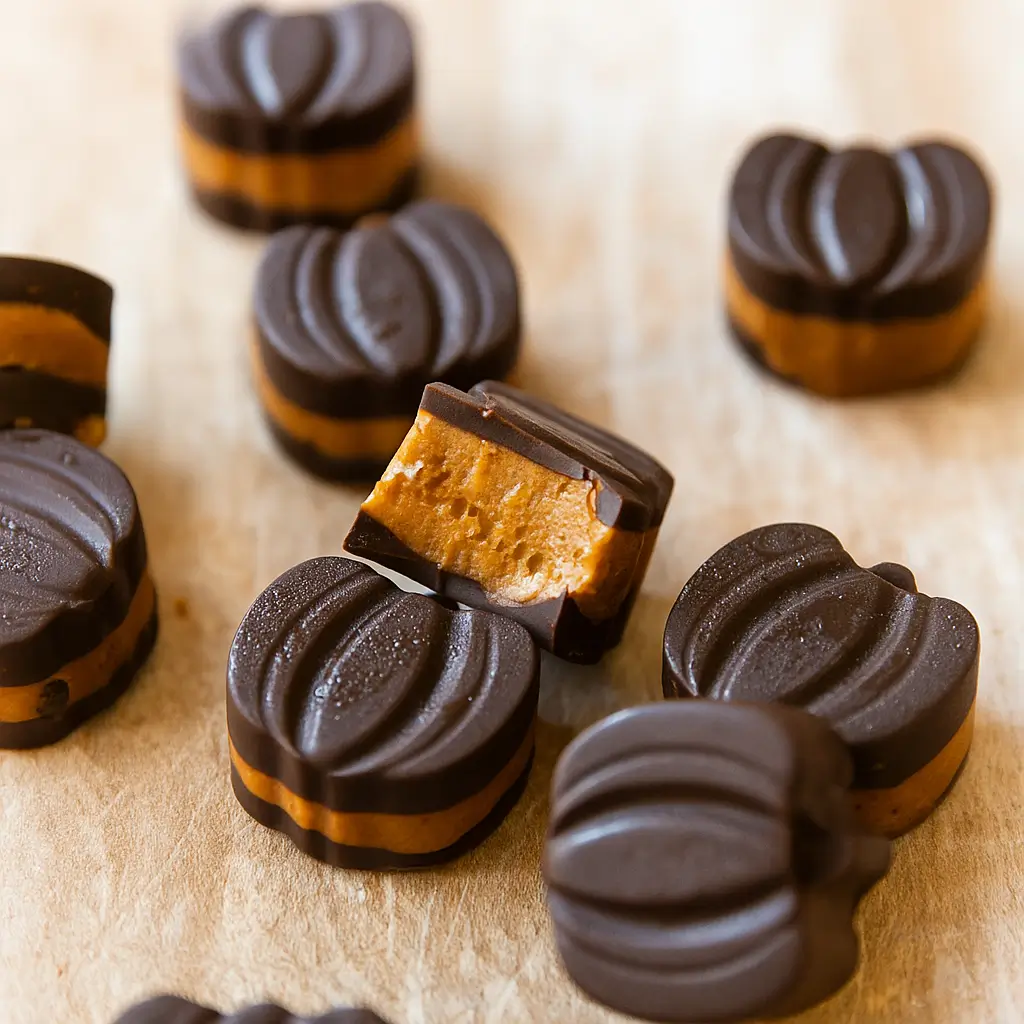
Chocolate Pumpkin Butter Cups are the treat you didn’t know you needed until now. Imagine the cozy flavors of pumpkin spice cozied up with silky dark chocolate—like fall wrapped in candy form. These little delights are dairy-free, lower in sugar, and ridiculously easy to whip up. Perfect for when you want a sweet bite without the sugar crash. Plus, they store like a dream in the freezer, making them a grab-and-go win for busy afternoons. Whether you’re planning a festive gathering or just need a personal stash of pumpkin happiness, these cups hit the sweet spot.
Table of Contents
What are Chocolate Pumpkin Butter Cups?
Chocolate Pumpkin Butter Cups are a seasonal twist on the classic peanut butter cup. Instead of peanut butter, you get a luscious pumpkin spice filling made with pumpkin puree, almond butter, and honey (or maple syrup if you’re feeling fancy). The filling is sandwiched between two layers of dark chocolate, creating a creamy-meets-crunchy bite. They’re festive, healthier than most store-bought candy, and completely customizable with your favorite nut or seed butter. Think of them as fall’s answer to Reese’s—perfectly portioned, deeply chocolatey, and kissed with pumpkin spice.
Reasons to Try Chocolate Pumpkin Butter Cups
Why should Chocolate Pumpkin Butter Cups be on your fall baking list? First, they’re quick: just 10 minutes of prep, then let the freezer do the heavy lifting. Second, they’re a healthier dessert option—no refined dairy, less sugar, and packed with flavor. Third, they’re freezer-friendly, so you can make a big batch and snack for weeks. Finally, they’re versatile. Want them sweeter? Use maple syrup. Allergic to nuts? Sunbutter has your back. And let’s not forget: these little cups make you look like a kitchen genius when really, they’re easier than boiling pasta.
Ingredients Needed to Make Chocolate Pumpkin Butter Cups
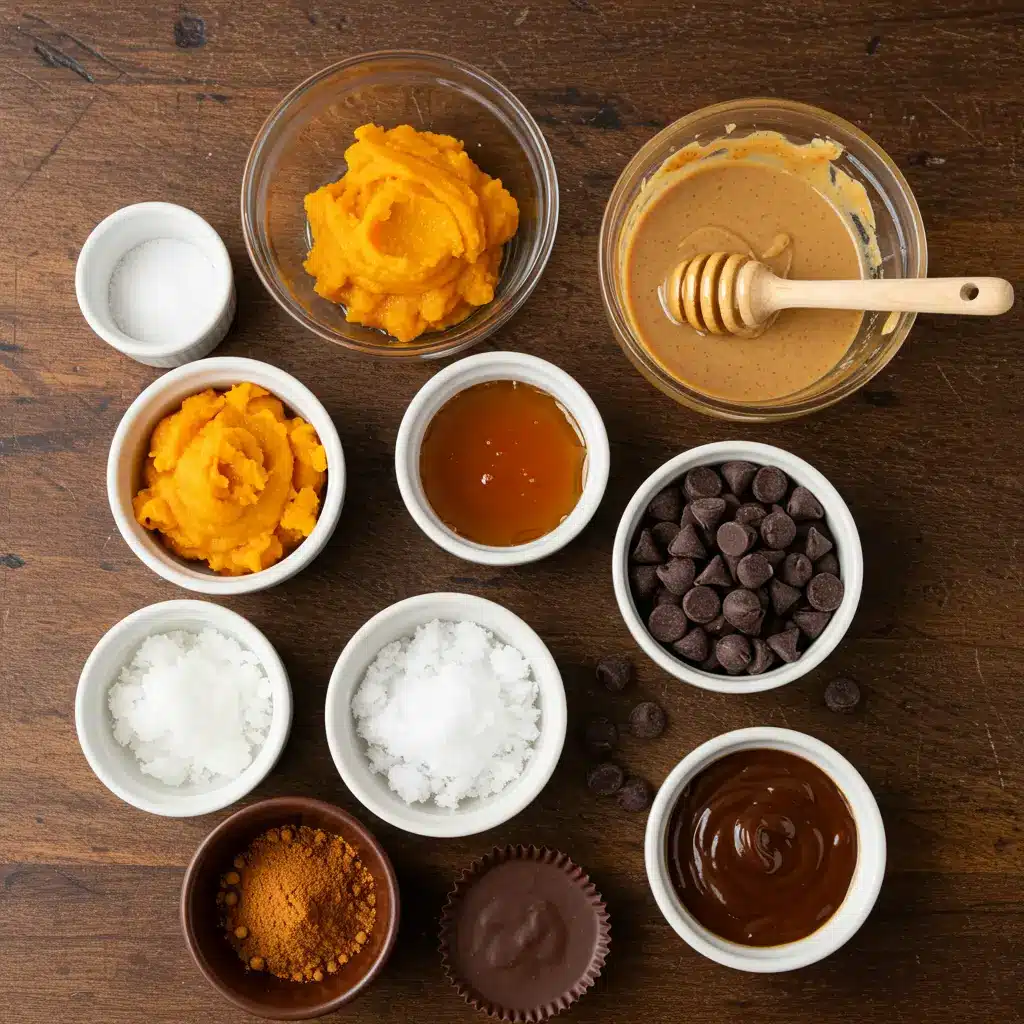
To bring Chocolate Pumpkin Butter Cups to life, you’ll need a handful of pantry staples and a few fall essentials. Think of it as gathering your little army of flavor before heading into chocolatey battle. Each ingredient plays a role—so let’s break it down in detail:
- Pumpkin Puree (½ cup): The star of the show! Smooth, unsweetened pumpkin puree gives the filling its cozy autumn vibe. If you’ve made homemade pumpkin puree, even better, but canned works perfectly too. For more pumpkin inspiration, try my Pumpkin Cheesecake Cinnamon Rolls which also use this fall favorite.
- Almond Butter (⅓ cup): This brings creaminess and nutty richness to the filling. Don’t stress if you’re out of almond butter—peanut butter, cashew butter, or even sunflower seed butter for a nut-free option will do the trick.
- Honey (2 tbsp): Natural sweetness that balances the deep flavor of the chocolate. You can swap in maple syrup if you want to keep the recipe vegan or if you love that extra maple flavor with pumpkin.
- Pumpkin Spice (2 tsp): The magic blend of cinnamon, nutmeg, ginger, and cloves that makes anything taste like fall in a single bite. If you don’t have premixed pumpkin spice, you can easily whip up your own blend.
- Chocolate Chips (1 cup): This is your base and topping. Dark chocolate chips give a nice rich flavor, but semi-sweet works if you want them a little sweeter. Use dairy-free chocolate if you want to keep these Chocolate Pumpkin Butter Cups completely dairy-free.
- Coconut Oil (1 tbsp): Just a splash helps melt the chocolate smoothly and gives it that perfect glossy finish.
When you line these up on your counter, you’ll realize how simple the ingredient list really is. Nothing fussy, just a few flavorful basics that transform into something magical once layered together.
Instructions to Make Chocolate Pumpkin Butter Cups
Making Chocolate Pumpkin Butter Cups might look fancy, but trust me—it’s easier than convincing kids to eat Halloween candy. Follow these step-by-step instructions and you’ll have a freezer stash of chocolatey pumpkin goodness before you know it.
Step 1: Prepare the Pumpkin Spice Filling
Start by softening the almond butter. Pop it in the microwave for about 30 seconds—this makes it easier to stir and helps the filling come together smoothly. In a medium mixing bowl, whisk together the pumpkin puree, almond butter, honey (or maple syrup), and pumpkin spice. Blend until the mixture looks creamy and unified, almost like a thick pumpkin pie batter. This is the cozy heart of your Chocolate Pumpkin Butter Cups.
Step 2: Melt the Chocolate Base
In a small heatproof bowl, combine the chocolate chips with the coconut oil. Microwave in 20-second bursts, stirring between each until the chocolate turns silky smooth. Be careful not to overheat; chocolate can seize up faster than you think. Once melted, you’ll have the glossy base and topping for your cups.
Step 3: Build the First Chocolate Layer
Grab your silicone candy molds or line a mini muffin tin with paper liners. Spoon a thin layer of melted chocolate into the bottom of each mold. Use the back of the spoon to spread it evenly. Place the tray in the freezer for about 10 minutes to harden. This gives you a solid foundation for the pumpkin filling.
Step 4: Pipe in the Pumpkin Filling
While the base is chilling, transfer the pumpkin spice mixture into a plastic bag or piping bag. Snip a small corner off—it doesn’t need to be fancy. Pipe a small mound of filling directly on top of the hardened chocolate base. Smooth it slightly with the back of a spoon if needed. Pop the tray back into the freezer for another 5–10 minutes.
Step 5: Seal with a Final Chocolate Layer
Now it’s time to lock in the flavor. Spoon more melted chocolate over the pumpkin filling, making sure it’s completely covered and sealed. Smooth the tops with a spoon so they look neat. Return the tray to the freezer for at least 1–2 hours, or until the Chocolate Pumpkin Butter Cups are fully set with a firm center.
Step 6: Enjoy and Store
Once hardened, pop the cups out of the molds and take a victory bite. You’ll get the snap of chocolate followed by the creamy, spiced pumpkin filling. Store the rest in an airtight container in the freezer for easy access. For another festive pumpkin treat that pairs beautifully with these, check out my Pumpkin Muffins—they’re the perfect match for a fall dessert spread.
What to Serve with Chocolate Pumpkin Butter Cups
Chocolate Pumpkin Butter Cups are bite-sized, but they pair beautifully with fall drinks and desserts. Serve them with a warm mug of spiced chai or a pumpkin latte for the ultimate cozy combo. They also make a fun addition to a fall dessert board alongside Pumpkin Cobbler or Iced Pumpkin Oatmeal Cookies. For a lighter option, pair them with fresh fruit—apple slices or pears balance the richness perfectly. Hosting a party? Pile them on a plate with Pumpkin Blondies for a dessert spread no one will forget.
Key Tips for Making Chocolate Pumpkin Butter Cups
- Use silicone molds for easy removal, but muffin liners work too.
- Don’t skip freezing between layers—it keeps the filling neat.
- For smaller candies, make thinner chocolate layers.
- Always store them in the freezer; they’ll melt on the counter.
- Make them ahead of time—they keep beautifully.
Storage and Reheating Tips Chocolate Pumpkin Butter Cups
Store Chocolate Pumpkin Butter Cups in an airtight container in the freezer for up to a month. They’re best enjoyed straight from frozen—just let them sit out for a couple of minutes to soften slightly. Avoid leaving them at room temp for long periods, as the filling gets gooey and the chocolate loses its snap. If you prefer a softer texture, store them in the fridge, but be warned: the centers won’t firm up as much. Pro tip: make double batches because these disappear faster than you think.
FAQs
1. Can I make these vegan?
Yes! Swap honey for maple syrup and use dairy-free chocolate chips.
2. What if I don’t have pumpkin spice?
Mix cinnamon, nutmeg, ginger, and cloves for a homemade blend.
3. Can I use peanut butter instead of almond butter?
Absolutely. Any nut or seed butter works.
4. How long do they last?
About 1 month in the freezer (if you don’t eat them all first).
5. Do I need special molds?
Nope—muffin liners work just fine.
Final Thoughts
Chocolate Pumpkin Butter Cups are proof that fall flavors and chocolate belong together. With just a few pantry staples, you can create a festive treat that looks fancy but is secretly super simple. They’re perfect for parties, gift-giving, or sneaky freezer raids when you want “just one more.” If pumpkin recipes are your love language, add these to your must-make list—you won’t regret it.
Visit our Pinterest for regular slow cooker recipe updates, or join our Facebook discussions where cooking fans exchange their favorite hearty meal ideas.
PrintChocolate Pumpkin Butter Cups – Easy & Dairy-Free Dessert

Chocolate Pumpkin Butter Cups are a fun and festive treat! The creamy pumpkin spice filling is sandwiched between dark chocolate to create the perfect bite every time. Plus, they’re lower in sugar and dairy-free!
- Prep Time: 10 minutes
- Cook Time: 0 minutes
- Total Time: 2 hours 10 minutes
- Yield: 24 cups
- Category: Dessert, Snack
- Method: No-Bake
- Cuisine: American
Ingredients
Pumpkin Spice Filling:
½ cup pumpkin puree
⅓ cup almond butter (or any nut/seed butter)
2 tablespoons honey (or maple syrup)
2 teaspoons pumpkin spice
Chocolate Layer:
1 cup chocolate chips
1 tablespoon coconut oil
Instructions
1. Microwave almond butter for about 30 seconds to soften.
2. In a bowl, whisk together pumpkin puree, honey, almond butter, and pumpkin spice until smooth. Set aside.
3. Melt chocolate chips and coconut oil in a microwave-safe bowl in 20-second increments until smooth.
4. Pour a thin layer of melted chocolate into silicone candy molds or mini cupcake liners. Freeze for 10 minutes to set.
5. Pipe or spoon the pumpkin spice filling on top of the chocolate layer. Freeze for 5-10 minutes.
6. Top with another layer of melted chocolate to cover filling. Freeze 1-2 hours, until firm.
7. Remove from molds and enjoy straight from the freezer.
Notes
Use silicone candy molds for festive shapes, or mini muffin liners for a Reese’s-style candy.
Do not leave candies at room temperature; they will soften. Store in an airtight container in the freezer.
For thinner candies, do not fill the molds completely.
Make a piping bag by filling a plastic baggie with the pumpkin mixture and snipping off a corner.
Store leftovers in the freezer for best texture.