There’s nothing quite like the Best Chicken Enchiladas to bring everyone to the table—fast. This dish wraps tender, shredded chicken in soft corn tortillas, covers it in a bold red enchilada sauce, and tops it off with bubbly, melty cheese. It’s everything you crave from a Mexican-inspired dinner without the stress of making everything from scratch.
Whether you’re wrangling hungry kids after work or hosting a casual weekend dinner, these enchiladas are the kind of comfort food that works overtime. Plus, thanks to shortcuts like rotisserie chicken and store-bought sauce (no shame!), you’ll have it all on the table in under an hour. Let’s dive into what makes these the best chicken enchiladas you’ll want on repeat.
Table of Contents
What is Best Chicken Enchiladas?
Chicken enchiladas are a classic Mexican-American favorite that strikes the perfect balance of savory, spicy, creamy, and cheesy. The Best Chicken Enchiladas start with tortillas—traditionally corn, but flour works too—stuffed with seasoned, shredded chicken, then smothered in red enchilada sauce and cheese before being baked until bubbly. What sets this version apart is how easy it is to throw together without sacrificing flavor.
We’re talking everyday pantry spices like cumin and chili powder, a little onion sautéed in olive oil for depth, and a big, warm hug from all that melty cheese. It’s the kind of recipe that tastes like it took hours, but really, it’s more of a “sauté, roll, bake” situation. Perfect for weeknights, yet totally dinner-party approved.
Reasons to Try Best Chicken Enchiladas
There are enchiladas, and then there are these Best Chicken Enchiladas. First, they’re ridiculously doable—even if your cooking skills top out at “microwave popcorn.” Using rotisserie chicken saves major time and effort. You also get to control the heat level depending on the enchilada sauce you use. Second, this is a dish that feeds picky eaters, comfort food lovers, and spice seekers alike.
It’s hearty, cheesy, and packed with familiar flavors (with no mystery ingredients). Lastly, leftovers reheat beautifully. In fact, dare I say they taste even better the next day. If you’re craving a family-friendly meal that hits all the right notes—savory, satisfying, simple—these enchiladas are your new go-to. You might even skip Taco Tuesday just to make them again.
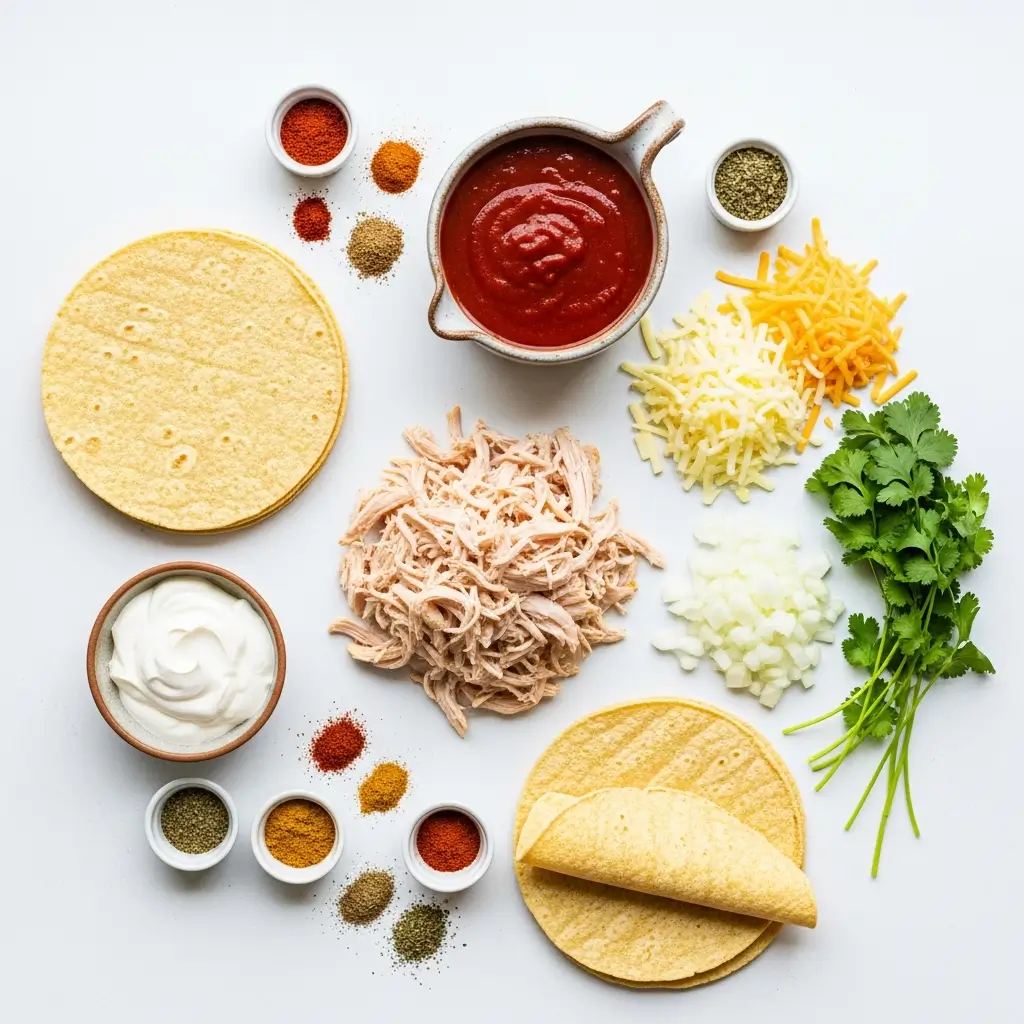
Ingredients Needed to Make Best Chicken Enchiladas
- 2 cups cooked chicken, shredded (rotisserie chicken is perfect here)
- 8 small corn tortillas (or flour tortillas if that’s your jam)
- 2 cups red enchilada sauce (store-bought or homemade)
- 1½ cups shredded cheddar or Mexican blend cheese
- 1 small onion, finely chopped
- ½ cup sour cream (optional, but lovely for serving)
- ¼ cup fresh cilantro, chopped (for garnish)
- 1 tablespoon olive oil
- ½ teaspoon cumin
- ½ teaspoon chili powder
- Salt and pepper to taste
Instructions to Make Best Chicken Enchiladas
Ready to whip up the Best Chicken Enchiladas ever? This step-by-step guide will walk you through each stage, from prepping your ingredients to pulling a bubbling, cheesy tray out of the oven. Whether it’s your first time or your fiftieth, these directions are crafted to keep things simple, stress-free, and totally delicious. Let’s do this!
Step 1: Preheat Your Oven for Success
Start by preheating your oven to 375°F (190°C). This is a crucial step because a fully heated oven ensures your enchiladas bake evenly and the cheese melts to that perfect golden, gooey finish. Cold ovens make for sad dinners, so don’t skip it. While it heats up, you can move on to prepping your ingredients. If you’re curious about how oven temperature impacts cooking, our baking tips section offers insights that can help avoid common kitchen mishaps.
Step 2: Sauté the Onion and Spice Up the Chicken
Grab a medium skillet and heat 1 tablespoon of olive oil over medium heat. Once the oil shimmers, add 1 finely chopped small onion. Sauté for about 4 to 5 minutes, stirring occasionally, until the onion softens and turns translucent. Now, sprinkle in ½ teaspoon each of cumin and chili powder, along with salt and pepper to taste.
The spices will bloom in the oil, creating a fragrant base that takes your filling from “meh” to “mmm.” Add 2 cups of shredded cooked chicken—rotisserie chicken is a great time-saver here—and stir well to coat every strand in that flavorful mix. If you want to make this step ahead, check out our prep-ahead dinner tips for busy weeknights.
Step 3: Warm the Tortillas the Right Way
Warming the tortillas before rolling them is a total step-by-step game-changer. It keeps them pliable and prevents cracking. You can do this in a dry skillet for 20 seconds per side, or stack them on a microwave-safe plate, cover with a damp paper towel, and heat for 30 seconds. Corn tortillas are traditional and add great texture, but if you prefer flour tortillas, those work too—especially if you’re feeding little ones who like softer wraps. Need a gluten-free option? Visit our gluten-free hushpuppies post for some easy swaps.
Step 4: Assemble the Enchiladas with Care
Lightly grease a 9×13-inch baking dish (just a thin layer of oil or non-stick spray will do). Then, pour ½ cup of enchilada sauce into the bottom of the dish and spread it around. This prevents sticking and gives the enchiladas a saucy head start.
Now, take one tortilla, spoon in a generous amount of the chicken mixture, and roll it up tightly like a mini burrito. Place it seam-side down in the dish. Repeat until all your tortillas are filled and lined up like delicious little soldiers.
Step 5: Drench with Sauce and Shower with Cheese
Pour the remaining enchilada sauce over the rolled tortillas, making sure each one is well coated. The more evenly you pour, the better the flavor will soak in during baking. Then, sprinkle 1½ cups of shredded cheddar or Mexican blend cheese all over the top. Don’t hold back here—this is comfort food! If you’re wondering which cheese melts best, you might enjoy our take on cheesy dishes like gnocchi mac and cheese for more melty inspiration.
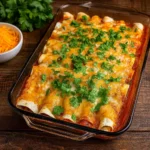
Step 6: Bake to Melty Perfection
Place the baking dish into your preheated oven and bake for 20 minutes. You’re looking for bubbly cheese, a slightly crispy edge on the tortillas, and sauce that’s heated through. If your oven runs hot or cold, check them at the 18-minute mark just to be safe. For a golden top, you can broil for 2 extra minutes at the end—but keep an eye on it!
Step 7: Garnish and Serve with Flair
Once out of the oven, let the enchiladas rest for 5 minutes (if you can wait!). This lets everything settle and makes serving easier. Sprinkle with ¼ cup of chopped fresh cilantro for color and flavor. Add a dollop of sour cream if you’re craving creamy contrast. Want to round it out with a fresh side? Our harvest glow bowl makes a beautiful pairing.
What to Serve with Best Chicken Enchiladas
Now that your Best Chicken Enchiladas are golden and gooey, you might be wondering what else to plate up. Honestly, they’re a full meal on their own—but if you’re feeling fancy, add a side. Try a bright salad like our Autumn Harvest Honeycrisp Apple and Feta Salad for a sweet-tart contrast. Or keep it classic with simple rice and beans. Craving a little heat? Pair with our Spicy Salmon Sushi Bake on the side for a fusion twist. Don’t forget tortilla chips and guac—or even a cold beer or sparkling limeade for the perfect sip. Comfort food never looked so colorful.
Key Tips for Making Best Chicken Enchiladas
Want next-level results without breaking a sweat? Here are a few tried-and-true tips. First, don’t skip warming your tortillas. Cold ones crack like a dried-out wishbone. Second, use rotisserie chicken—it saves time and adds flavor. If you’re going DIY, season your chicken well. Third, don’t skimp on the sauce. You want those enchiladas drenched, not dry. If your sauce is spicy, go easy on the chili powder in the filling. Finally, make them ahead if you’re hosting. Just cover and chill up to 24 hours before baking. They’re a stress-free hit every time.
Storage and Reheating Tips Best Chicken Enchiladas
Leftovers? Lucky you. The Best Chicken Enchiladas store well, which makes them awesome for lunch or dinner repeats. Let them cool, then store in an airtight container in the fridge for up to 4 days. For longer storage, freeze them—just wrap tightly and place in a freezer-safe dish. To reheat, pop a single portion in the microwave for 1–2 minutes or reheat the whole dish in the oven at 350°F for about 15–20 minutes, covered with foil. If frozen, let them thaw overnight first. Add a splash of extra enchilada sauce before reheating if they’ve dried out a bit—it brings the moisture and flavor right back.
FAQs
Can I make these enchiladas vegetarian?
Absolutely. Swap the chicken for black beans, sautéed mushrooms, or a plant-based protein.
Can I freeze them before baking?
Yep! Assemble the enchiladas, skip the baking, and freeze them. Just thaw overnight and bake as directed.
What’s the best cheese to use?
A Mexican blend is great, but sharp cheddar or even Monterey Jack work beautifully.
Can I make homemade enchilada sauce?
Sure can. If you’ve got time, homemade always levels up flavor. If not, use a high-quality store brand—no guilt here.
Final Thoughts
Whether it’s a cozy family dinner or a “treat yo’ self” kind of night, the Best Chicken Enchiladas are that satisfying, go-to dish that never lets you down. Simple, flavorful, and endlessly customizable, they’ll quickly earn a regular spot in your weekly rotation. For more crave-worthy meals, check out our Creamy Tuscan Marry Me Butter Beans or Garlic Chicken Gnocchi Skillet—easy recipes that deliver big flavor without the fuss. Now go preheat that oven. These enchiladas aren’t going to bake themselves.
Visit our Pinterest for regular slow cooker recipe updates, or join our Facebook discussions where cooking fans exchange their favorite hearty meal ideas.
PrintBest Chicken Enchiladas: Easy, Cheesy Weeknight Favorite
Juicy shredded chicken wrapped in warm tortillas, smothered in red enchilada sauce, and topped with melted cheese—this comforting Mexican-inspired dish is easy to make and packed with flavor.
- Prep Time: 15 minutes
- Cook Time: 20 minutes
- Total Time: 35 minutes
- Yield: Serves 4
- Category: Main
- Method: Baking
- Cuisine: Mexican
Ingredients
- 2 cups cooked chicken, shredded (rotisserie chicken works great)
- 8 small corn tortillas (or flour tortillas, if preferred)
- 2 cups red enchilada sauce (store-bought or homemade)
- 1 1/2 cups shredded cheddar or Mexican blend cheese
- 1 small onion, finely chopped
- 1/2 cup sour cream (optional, for serving)
- 1/4 cup fresh cilantro, chopped (for garnish)
- 1 tablespoon olive oil
- 1/2 teaspoon cumin
- 1/2 teaspoon chili powder
- Salt and pepper to taste
Instructions
1. Preheat your oven to 375°F (190°C).
2. In a skillet over medium heat, warm the olive oil. Add chopped onion and sauté for 4–5 minutes until softened.
3. Stir in cumin, chili powder, salt, and pepper. Add shredded chicken and toss to coat evenly with the seasonings. Set aside.
4. Warm each tortilla in a dry skillet or microwave for about 20 seconds to make them more pliable.
5. Spread 1/2 cup of enchilada sauce in the bottom of a baking dish.
6. Fill each tortilla with the seasoned chicken mixture, roll tightly, and place seam-side down in the baking dish.
7. Pour the remaining enchilada sauce over the rolled tortillas, coating them completely.
8. Sprinkle shredded cheese evenly over the top of the enchiladas.
9. Bake for 20 minutes, or until the cheese is melted and bubbly.
10. Garnish with chopped cilantro and serve with sour cream if desired.
Notes
You can use either corn or flour tortillas depending on your preference.
Make your own enchilada sauce for a more authentic, homemade flavor.
These enchiladas can be assembled in advance and refrigerated up to 24 hours before baking.