Anti-Inflammatory Harvest Glow Bowl is the cozy, colorful dinner your body and taste buds will both thank you for. Whether you’ve been chasing kids all day, juggling Zoom calls, or just trying to remember what day it is (we’ve all been there), this recipe swoops in like a warm hug. Packed with nourishing veggies like sweet potatoes, cauliflower, and carrots—and topped off with a creamy tahini yogurt sauce—it’s the kind of dinner that feels indulgent but secretly checks all your healthy boxes.
Not only is it full of anti-inflammatory ingredients, but it’s also delightfully easy to prep, even on a busy weeknight. If you’re craving something vibrant, hearty, and sneakily good for you, this Anti-Inflammatory Harvest Glow Bowl might just become your new go-to. Plus, it’s totally meal-prep friendly for those “I can’t even” days when cooking feels like a full-time job.
Table of Contents
What is Anti-Inflammatory Harvest Glow Bowl?
The Anti-Inflammatory Harvest Glow Bowl is a roasted veggie bowl layered with flavor, texture, and nutrients. Think of it like a salad that got all dressed up for fall: you’ve got warm, caramelized cauliflower, sweet roasted carrots, creamy chunks of sweet potato, and crispy chickpeas all tossed into a bowl like nature’s confetti. But what really ties it all together is the dreamy tahini yogurt sauce. It’s creamy, garlicky, lemony—and kind of addictive.
This dish isn’t just pretty; it’s functional too. Every ingredient was chosen with your health in mind. Cauliflower and sweet potatoes are rich in antioxidants. Chickpeas pack plant-based protein and fiber. Tahini and olive oil bring in those heart-loving fats. And let’s not forget the spices—cumin and paprika are flavor-packed and anti-inflammatory powerhouses. It’s basically your body’s way of saying “thank you” for skipping the drive-thru.
Reasons to Try Anti-Inflammatory Harvest Glow Bowl
Let’s be real—eating healthy can sometimes feel like chewing cardboard in the name of wellness. But this Anti-Inflammatory Harvest Glow Bowl? It’s a flavor party in a bowl. First off, it’s seriously simple. No complicated steps, just chopping, roasting, blending, and assembling. It’s also wildly customizable—don’t have arugula? Use spinach. Want more crunch? Toss in some pumpkin seeds. Secondly, it’s the dinner your gut, skin, and hormones will cheer for.
Thanks to the fiber-rich veggies and omega-loaded tahini, this bowl supports digestion, reduces inflammation, and even gives your skin a happy glow. Oh, and it stores well too, making it perfect for meal prepping or lazy leftovers. Bonus? It’s vegetarian (vegan if you swap the yogurt) and hits that sweet spot of being filling but not heavy. It’s like autumn wrapped in a nourishing little bowl.
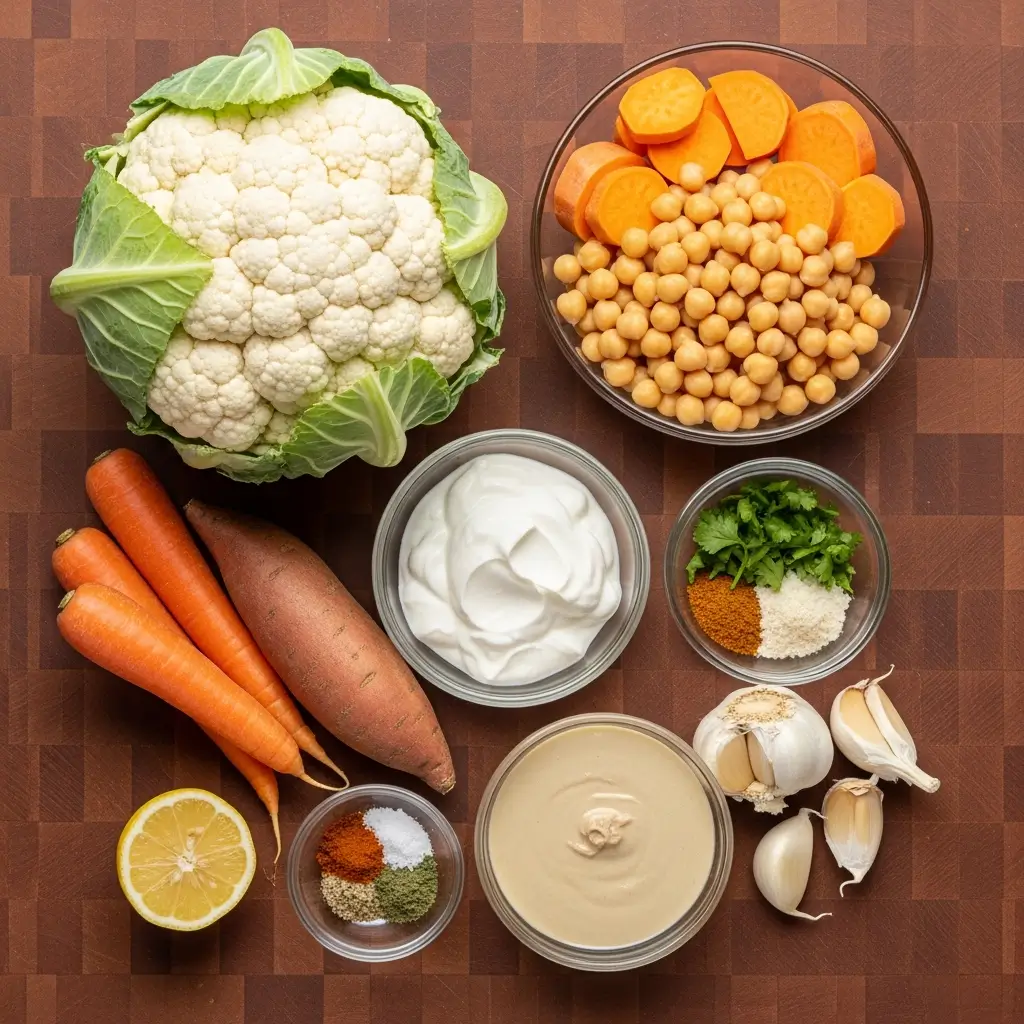
Ingredients Needed to Make Anti-Inflammatory Harvest Glow Bowl
For the Roasted Carrots and Cauliflower:
- 1 head cauliflower, cut into florets (or 12 oz pre-cut)
- 3 large carrots, sliced into rounds
- 2 tbsp extra virgin olive oil
- ½ tsp garlic powder
- 1 tsp oregano
- 1 tsp paprika
- 1 tsp ground cumin
- ½ tsp salt (plus more to taste)
- ¼ tsp ground black pepper
- ½ large lemon, juiced (about 2 tbsp)
- ¼ cup fresh parsley, chopped (optional)
For the Roasted Chickpeas and Sweet Potatoes:
- 1 can (15.5–16 oz) chickpeas, rinsed and dried
- 1 sweet potato, diced
- 2 tbsp extra virgin olive oil
- ½ tsp ground cumin
- ½ tsp paprika
- ¼ tsp garlic powder
- ½ tsp salt (more to taste)
- ⅕ tsp black pepper
For the Tahini Yogurt Sauce:
- 1 cup Greek yogurt (or plant-based alternative)
- ¼ cup tahini
- Juice of 1 large lemon (about ¼ cup)
- 2 tbsp extra virgin olive oil
- 1 garlic clove
- ½ tsp ground cumin
- ½ tsp salt
For the Bowl:
- Arugula or greens of choice
- Toppings of choice (e.g., pumpkin seeds, pickled onions, feta)
Instructions to Make Anti-Inflammatory Harvest Glow Bowl
Making this Anti-Inflammatory Harvest Glow Bowl is surprisingly simple and incredibly satisfying—especially when you break it down step by step. Whether you’re a kitchen newbie or a busy weeknight warrior, this guide walks you through every detail with clarity, confidence, and just enough sass to keep it fun. Follow this step-by-step process to transform humble veggies into a flavorful, anti-inflammatory feast.
Step 1: Prep and Roast the Cauliflower and Carrots
Let’s start by preheating your oven to 425°F (that’s your signal to get things sizzling). While it’s warming up, grab a rimmed baking sheet and line it with parchment paper—this keeps the veggies from sticking and makes cleanup way easier (trust us, you’ll thank yourself later).
Cut your cauliflower into bite-sized florets and slice your carrots into rounds. If you’re short on time, feel free to use pre-cut veggies from the grocery store—check out this guide on veggie shortcuts to save even more time.
Toss the cauliflower and carrots in a bowl with olive oil, garlic powder, oregano, paprika, cumin, salt, and pepper. Mix until everything is beautifully coated in that spice blend. Spread them out on your baking sheet in a single layer (crowded veggies = steamed veggies = no crispy edges).
Roast for about 25–30 minutes. Once they’ve started to caramelize, pull them out and drizzle with lemon juice. Add a sprinkle of chopped parsley for freshness. Then, back into the oven they go for another 5–10 minutes until they’re gorgeously golden. This step-by-step method builds big flavor with very little effort.
Step 2: Roast the Chickpeas and Sweet Potatoes
Now onto another tray (yes, you’ll want a second one for best results). Line it with parchment paper, too, and get ready to crisp up those chickpeas and sweet potatoes.
Start by rinsing and draining your canned chickpeas. Pat them dry thoroughly using a kitchen towel or paper towels—getting them super dry is the secret to that crunch factor. For more tips on making chickpeas extra crispy, check out our crispy broccoli and cheese pierogy skillet where we use similar techniques.
Toss the chickpeas with olive oil, cumin, paprika, garlic powder, salt, and pepper. Spread them on one half of your sheet pan. On the other half, add diced sweet potatoes seasoned with oil, salt, and pepper.
Roast for 20–28 minutes, checking occasionally for that golden crispiness. The chickpeas should be crunchy on the outside and tender inside, while the sweet potatoes should have caramelized edges.
Step 3: Make the Tahini Yogurt Sauce
While your trays are working their magic in the oven, let’s whip up the creamy, dreamy tahini yogurt sauce. This sauce pulls the whole dish together and gives it that signature “glow bowl” richness.
Add Greek yogurt (or your favorite plant-based alternative), tahini, fresh lemon juice, olive oil, garlic, cumin, and salt into a blender or food processor. Blend for 30–60 seconds until smooth and silky. If it’s too thick, add a splash of water—just a tablespoon at a time—until it’s pourable but still creamy.
This sauce is chef’s kiss and makes a great dip for other dishes too. You might want to double the batch and save some for later or try it with roasted sweet potato rounds with honey for a sweet-savory twist.
Step 4: Assemble Your Glow Bowl
Now for the fun part—assembling your glow bowl. Start with a generous spoonful of the tahini yogurt sauce as the base. You can swirl it around like a sauce artist or just dollop it—it’s your bowl, your rules.
Add a bed of greens like arugula or spinach. Arugula adds a peppery kick that pairs beautifully with the sweet and savory elements in the bowl. Then start layering in your roasted carrots, cauliflower, sweet potatoes, and crispy chickpeas. Arrange them however you like—neatly sectioned or all piled together.
Top it off with extra lemon juice, a sprinkle of herbs, or even some crunch like pumpkin seeds or pickled onions. If you’re looking for a show-stopping finish, borrow a trick from our roasted beets and carrots with burrata and toss in something creamy like crumbled feta.
And just like that, you’ve made your own Anti-Inflammatory Harvest Glow Bowl, step by step, from scratch.
What to Serve with Anti-Inflammatory Harvest Glow Bowl
This bowl’s got enough going on to be a meal all on its own, but if you want to round things out, pair it with a light soup like this easy anti-inflammatory turmeric chicken soup or nourishing turmeric golden soup. Craving a little crunch? A side of spinach and artichoke dip with crackers works great for entertaining. And for dessert? Go with something warm and spiced like a caramel apple spice cake. You’ve earned it.
Key Tips for Making Anti-Inflammatory Harvest Glow Bowl
Dry those chickpeas like your crunch depends on it—because it does. Want to save time? Use pre-cut cauliflower and carrots. Don’t skimp on the lemon—it brightens the whole bowl. You can batch the tahini yogurt sauce ahead of time; it stays happy in the fridge for a few days. Prefer a vegan version? Swap Greek yogurt for coconut or almond-based alternatives. Pro tip: roast everything on separate pans to avoid crowding and sogginess. And always taste as you go—because flavor is personal, not prescriptive.
Storage and Reheating Tips for Anti-Inflammatory Harvest Glow Bowl
Leftovers? Yes, please. Store your roasted veggies and chickpeas in airtight containers in the fridge for up to 4–5 days. Keep the tahini yogurt sauce separate—it helps everything stay fresher and less soggy. Reheat veggies in the oven or air fryer at 375°F for 8–10 minutes to revive that crispy magic. Microwaving is fine too, but it won’t give you that same golden texture. Chickpeas can stay at room temp for a day or two (lid slightly open) if you want to keep them crunchy. Sauce getting too thick? Stir in a splash of water or lemon juice to wake it up.
FAQs
Can I make this ahead of time?
Totally. Roast the veggies and chickpeas, make the sauce, and store everything separately. Assemble when ready to eat.
Is it vegan-friendly?
Yep—just use plant-based yogurt for the sauce and skip any dairy toppings.
What greens work best?
Arugula adds a nice bite, but spinach, kale, or mixed greens work great too.
What can I substitute for tahini?
Try almond butter or sunflower seed butter for a similar vibe.
Can I add protein?
Absolutely—grilled chicken or tofu work great for extra staying power.
Final Thoughts
This Anti-Inflammatory Harvest Glow Bowl isn’t just a pretty plate—it’s a nourishing, flavor-packed meal that fits right into your real-life routine. Whether you’re cooking for one or feeding a busy crew, it’s easy, healthy, and completely craveable. Plus, it proves that anti-inflammatory meals don’t have to be bland or boring. Want more veggie-forward ideas? Don’t miss our easy spiced carrot and sweet potato soup—it’s another anti-inflammatory winner. Ready to glow from the inside out? This bowl’s got your back.
Visit our Pinterest for regular slow cooker recipe updates, or join our Facebook discussions where cooking fans exchange their favorite hearty meal ideas.
PrintAnti-Inflammatory Harvest Glow Bowl (with Creamy Tahini Sauce)

This colorful Anti-Inflammatory Harvest Glow Bowl is the best way to get in a lot of nutrition with optimal flavor! Perfectly roasted cauliflower and carrots are combined with sweet potato and crispy chickpeas – all topped off with a creamy tahini yogurt dressing. It’s hearty, vibrant, and packed with anti-inflammatory ingredients, making it perfect for a wholesome dinner or meal prep lunch.
- Prep Time: 15 minutes
- Cook Time: 30 minutes
- Total Time: 45 minutes
- Yield: 4 servings
- Category: Dinner
- Method: Roasting
- Cuisine: American
- Diet: Vegetarian
Ingredients
For Roasted Carrots and Cauliflower:
- 1 head cauliflower, cut into florets (or 12 oz precut cauliflower florets)
- 3 large carrots, cut into round pieces
- 2 tablespoon extra virgin olive oil (more as needed)
- ½ teaspoon garlic powder
- 1 teaspoon oregano
- 1 teaspoon paprika
- 1 teaspoon ground cumin
- ½ teaspoon salt (more to taste)
- ¼ teaspoon ground black pepper
- ½ large lemon, juiced (about 2 Tbsp)
- ¼ cup fresh parsley, chopped (optional)
For Roasted Chickpeas and Sweet Potatoes:
- 1 can chickpeas (15.5 oz–16 oz), rinsed and drained
- 1 sweet potato, diced
- 2 tablespoon extra virgin olive oil
- ½ teaspoon ground cumin
- ½ teaspoon paprika
- ¼ teaspoon garlic powder
- ½ teaspoon salt (more to taste)
- ⅕ teaspoon ground black pepper (more to taste)
For Tahini Yogurt Sauce:
- 1 cup greek yogurt (or plant-based yogurt)
- ¼ cup tahini
- 1 large lemon, juiced (about ¼ cup)
- 2 tablespoon extra virgin olive oil
- 1 clove garlic
- ½ teaspoon ground cumin
- ½ teaspoon salt
For the Bowl:
- Arugula or greens of choice (optional)
- Toppings of choice (optional)
Instructions
1. Preheat oven to 425℉/220°C. Line a rimmed baking sheet with parchment paper. Add chopped cauliflower and carrots in a single layer. Coat with olive oil and the spice mix. Roast for 25–30 minutes. Add lemon juice and parsley, then roast for another 5–10 minutes until golden brown.
2. Line a second rimmed baking sheet with parchment paper. Rinse, drain, and dry chickpeas. Toss chickpeas in oil and spices. Place chickpeas on half of the sheet. Add diced sweet potatoes to the other half with oil, salt, and pepper. Roast for 20–28 minutes until tender and crisp.
3. While vegetables roast, prepare tahini yogurt sauce by blending all ingredients until smooth. Add water to thin if desired.
4. To assemble, spread tahini yogurt sauce in a bowl. Top with arugula, roasted cauliflower, carrots, sweet potatoes, and chickpeas. Add toppings and extra lemon juice, if desired. Enjoy!
Notes
Meal prep by chopping vegetables ahead of time or using pre-cut produce to save time.
Rinse and thoroughly dry chickpeas before roasting for maximum crispiness.
Store roasted vegetables and sauce separately in the fridge for 4–5 days. Store roasted chickpeas in a jar at room temperature with a loose lid for up to 7 days.
This bowl is full of plant protein, fiber, and anti-inflammatory nutrients like vitamin C, vitamin A, and magnesium.
Designate a weekly “chopping power hour” to prep veggies and make healthy dinners easier.