If the phrase “Juicy Dry Brined Spatchcock Turkey” sounds a bit like Thanksgiving gibberish, hang tight—it’s actually your ticket to turkey greatness. You know how turkey can sometimes be the driest guest at the table, no matter how much gravy you throw at it? Yeah, this one flips that story on its crispy little head.
With a citrusy dry brine, buttery herbs, and a good ol’ backbone crack, this turkey cooks faster, crisps better, and tastes like something straight out of a food magazine… but without the stress or the culinary degree. This Juicy Dry Brined Spatchcock Turkey comes together in under two hours (not counting brine time), freeing up oven space for all your sides—and sanity.
Table of Contents
What is Juicy Dry Brined Spatchcock Turkey?
A Juicy Dry Brined Spatchcock Turkey is exactly what it sounds like: a turkey that’s been spatchcocked (which means removing the backbone and flattening it), then dry brined with citrus zest and salt to lock in flavor and moisture. Instead of soaking the bird in buckets of saltwater, this method draws out excess moisture while seasoning the meat deeply.
Spatchcocking isn’t just fun to say—it’s a game-changer. It cuts the cook time nearly in half and gives you the kind of golden, evenly crisp skin that makes folks fight over the corner pieces. The result? A beautifully roasted turkey that’s juicy on the inside, shatteringly crisp on the outside, and fully cooked without the breast drying out before the thighs catch up.
Reasons to Try Juicy Dry Brined Spatchcock Turkey
So why should you trust this Juicy Dry Brined Spatchcock Turkey to headline your holiday spread? First off, it cooks faster—like 90 minutes fast. That means you won’t be sweating bullets come 3 p.m. Thanksgiving Day while your guests wonder if the bird’s still thawing. Second, the citrus dry brine doesn’t just season—it infuses. The zest of oranges, lemons, and limes adds a subtle brightness that cuts through the richness. And then there’s the skin.
Oh, that skin. Crisp, golden, almost snackable on its own. Plus, this method makes it easier to carve (thank you, flattened bird). And if you’re dealing with a picky crowd or just want to shake things up, this technique is stress-reducing and shockingly reliable. You might never go back to the whole-bird roast again.
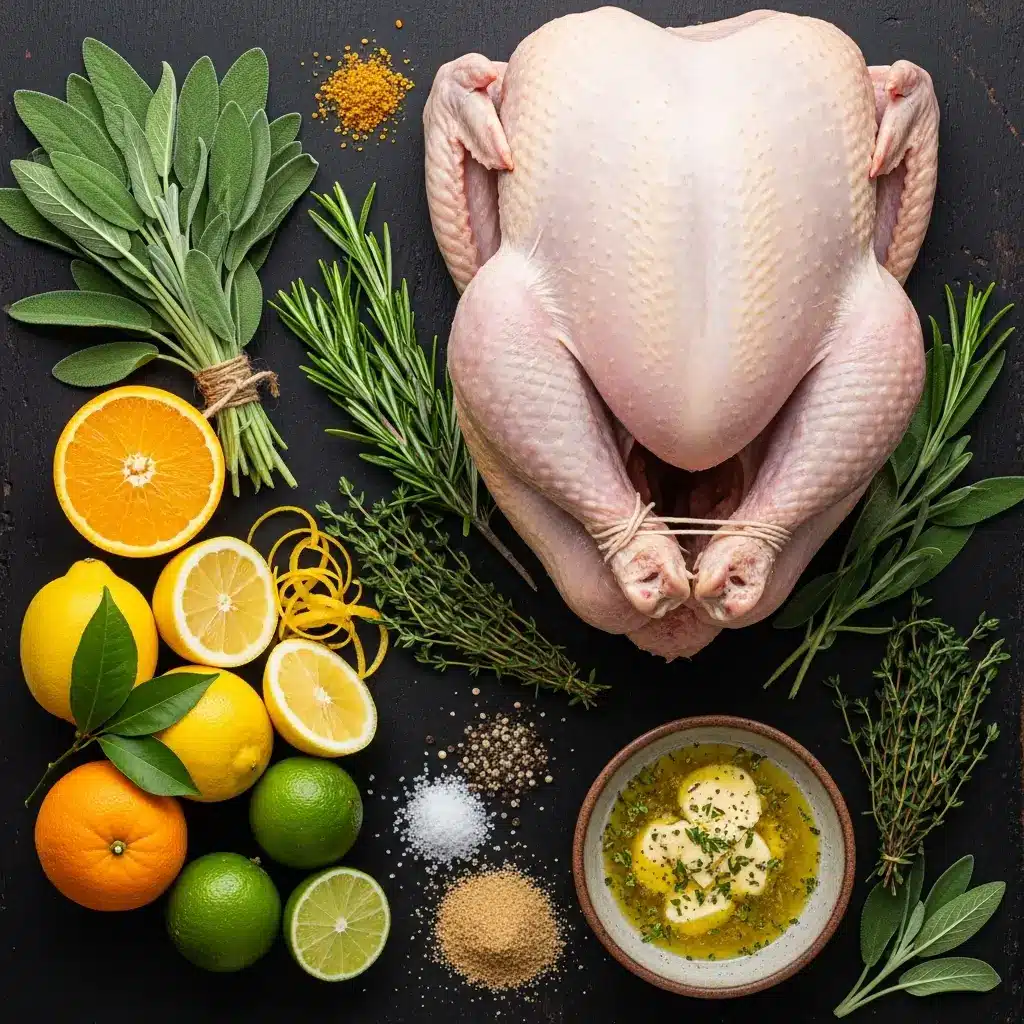
Ingredients Needed to Make Juicy Dry Brined Spatchcock Turkey
- 1 whole turkey (13–16 lbs), giblets and neck removed
- For the Citrus Dry Brine
- 2 large oranges, finely zested
- 3 lemons, finely zested
- 2 limes, finely zested
- ⅓ cup kosher salt
- ¼ cup light brown sugar
- 1 tablespoon freshly cracked black pepper
- For the Herb Butter
- 8 tablespoons clarified butter or ghee
- 3 stems fresh thyme, leaves finely chopped
- 2 stems fresh rosemary, leaves finely chopped
- 4 sage leaves, finely chopped
Instructions to Make Juicy Dry Brined Spatchcock Turkey
Ready to tackle the most flavorful, juicy turkey of your life? This Juicy Dry Brined Spatchcock Turkey guide breaks everything down step by step—so whether you’re a holiday pro or hosting for the first time, you’ll feel totally in control. Let’s dive into the full process with practical, approachable steps and tips baked right in.
Step 1: Spatchcock the Turkey
This is where the magic begins. Spatchcocking might sound intimidating, but it’s easier than it looks—and a total game-changer. Place your thawed turkey on a large cutting board, breast-side down. Using sharp poultry shears, cut along each side of the backbone, starting at the tail end and working toward the neck. (Tip: Save that backbone for a flavor-packed Leftover Turkey Soup or homemade stock.)
Once the spine is removed, flip the turkey breast-side up and use the heel of your palm to press firmly down on the breastbone until it cracks. This helps the turkey lay flat, allowing for even, quick cooking—one of the many perks of the spatchcock technique.
Need help with this step? Check out our prep-friendly kitchen tools guide for recommended shears and cutting boards to make spatchcocking safer and smoother.
Step 2: Make the Citrus Dry Brine
Grab a small bowl and combine the finely zested peels of two oranges, three lemons, and two limes with ⅓ cup kosher salt, ¼ cup light brown sugar, and a tablespoon of freshly cracked black pepper. This vibrant dry brine doesn’t just season the bird—it infuses it with subtle citrusy depth that cuts through the richness of the meat.
Using paper towels, pat the turkey completely dry—this is a critical step to get that ultra-crispy skin. Then, rub the dry brine all over the skin and inside the cavity, getting into every nook and cranny, especially under the wings and thighs.
Place the turkey skin-side up on a wire rack set over a rimmed baking sheet. Slide it (uncovered!) into the fridge for at least 8 hours or up to 24. This air-chill time helps the skin dry out for optimal crispiness while the salt works its juicy magic.
Need a substitute for citrus? Our ingredient substitution guide has options in case you’re out of oranges or lemons.
Step 3: Prepare the Herb Butter
While your turkey brines, it’s time to whip up the good stuff. In a saucepan or microwave-safe bowl, gently melt 8 tablespoons of clarified butter or ghee. Stir in 3 chopped stems of thyme, 2 of rosemary, and 4 sage leaves. This simple herb butter gives the turkey that mouthwatering golden finish and deep herbaceous aroma.
If you don’t have clarified butter, don’t stress—you can use high smoke-point oils like avocado or grapeseed oil, both of which work beautifully for roasting. Check out our kitchen swaps article for more substitution ideas.
Step 4: Preheat the Oven and Prep the Turkey
About 30–60 minutes before roasting, take the turkey out of the fridge and let it sit at room temperature. Skipping this step can lead to uneven cooking (and no one wants dry breast meat and underdone thighs).
Meanwhile, preheat your oven to a sizzling 450°F (230°C). Use this time to blot the turkey’s skin again with fresh paper towels to remove any surface moisture. The drier the skin, the crispier the result—this is where the dry brine and air chilling really shine.
Using a pastry brush or silicone brush, slather that herby butter all over the turkey, focusing especially on the skin. Don’t be shy—this step is what gives your Juicy Dry Brined Spatchcock Turkey its iconic golden-brown finish.
Step 5: Roast the Turkey (Step by Step)
Place the buttered bird back on its wire rack and baking sheet. Slide it into the preheated oven and let it roast for about 90 to 110 minutes. That’s right—less than two hours to fully cook a whole turkey!
Keep a close eye on it, especially around the 45-minute mark. If the breast skin is browning too quickly, loosely tent it with foil to prevent over-darkening while allowing the legs to catch up.
Use a meat thermometer in the thickest part of the thigh—you’re aiming for an internal temperature of 165°F (74°C). Remember, color alone isn’t a reliable indicator here. A good thermometer is your best friend (and your dinner’s insurance policy).
Pro Tip: Avoid those built-in plastic “pop-up” thermometers—they’re often off by 15–20 degrees, which could leave you with dry, overcooked meat. No thank you.
Step 6: Rest the Turkey
Once your turkey reaches that perfect internal temperature, take it out and let it rest for at least 40 minutes. Yes, you read that right—this part matters just as much as the cooking. It allows the juices to redistribute through the meat instead of running out the second you slice in.
Tent the turkey loosely with foil while it rests. During this time, you can warm up side dishes, prep dessert, or steal a few bites of crispy skin if no one’s looking (no judgment).
Looking for what to serve while the turkey rests? Try our cozy Roasted Autumn Vegetable Pot Pies or Soft Baked Apple Cinnamon Rolls for a sweet contrast.
Step 7: Carve and Serve
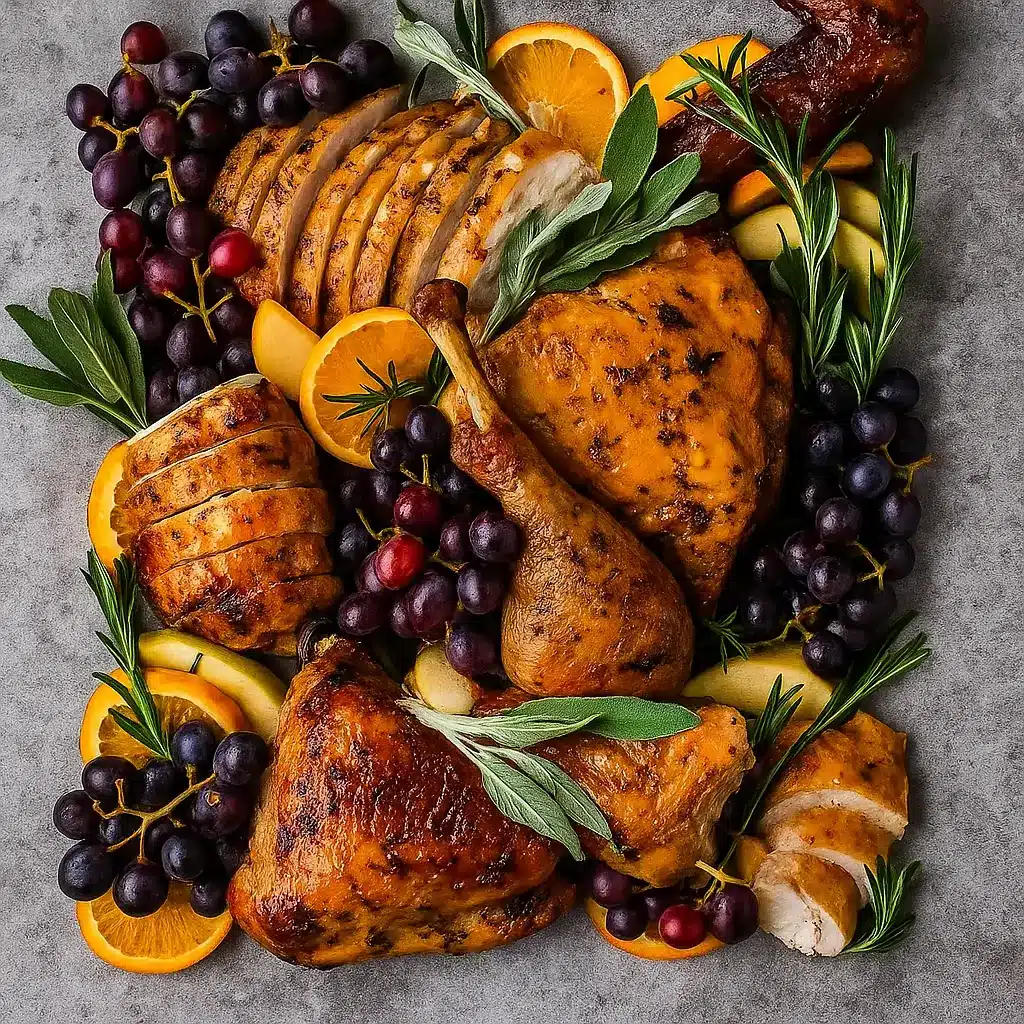
Once your Juicy Dry Brined Spatchcock Turkey has rested, carve it up like a pro. The flattened shape makes it so much easier than wrestling with a whole bird—just slice between the legs and breast, then portion as needed.
Arrange on a platter, garnish with extra citrus slices or herbs if you’re feeling fancy, and prepare to be crowned “Turkey MVP” of the year.
What to Serve with Juicy Dry Brined Spatchcock Turkey
Pair this showstopper with comforting, flavorful sides that match its roasted, citrus-herb vibes. Try something hearty like this Cinnamon Honey Butter Sweet Potato Cornbread or go classic with Roasted Autumn Vegetable Pot Pies for your veggie-lovers. A tangy cranberry sauce or maple-roasted carrots would also be perfect for balance. And for dessert? The Pumpkin Pie Twists are calling your name. This turkey might be the star, but the supporting cast is crucial for that “wow” factor.
Key Tips for Making Juicy Dry Brined Spatchcock Turkey
Let the bird chill out. That overnight dry brine? Non-negotiable. It’s the secret behind the flavor-packed, juicy meat. Use a meat thermometer—don’t trust those pop-up timers (they’re basically lies in plastic form). Want crispy skin? Pat. It. Dry. Cold bird straight from the fridge = rubbery skin and uneven cooking, so let it come to room temp a bit first. Don’t skip the rest time after roasting. It’s tempting to dive in, but resting locks in all those gorgeous juices. And hey, if your shears are struggling, don’t be afraid to ask the butcher to spatchcock it for you. No shame in a little help!
Storage and Reheating Tips Juicy Dry Brined Spatchcock Turkey
Got leftovers? Lucky you. Store the carved turkey in airtight containers in the fridge for up to 4 days. For reheating, place slices in a baking dish with a splash of broth, cover with foil, and warm at 300°F until heated through. This keeps it juicy, not chewy. The leftover bones and spine? Save ’em for a killer homemade broth. If freezing, wrap tightly in foil, place in a freezer-safe bag, and use within 2 months. You can also turn leftovers into next-day magic like White Turkey Chili or a comforting Turkey Rice Soup.
FAQs
Can I spatchcock a frozen turkey?
You’ll need to thaw it first. Budget about 24 hours of fridge time per 4 pounds of turkey.
What if I don’t have clarified butter?
Use a high smoke-point oil like avocado or grapeseed oil. Olive oil works in a pinch, too.
Can I use this recipe for a smaller turkey?
Absolutely. Just reduce cook time accordingly—use that thermometer as your guide.
Do I have to use citrus in the brine?
It’s what makes this recipe pop! But if needed, skip it and stick with the salt, sugar, and pepper.
Why remove the backbone?
Spatchcocking lets the turkey lay flat, so it cooks evenly and much faster.
Final Thoughts
A Juicy Dry Brined Spatchcock Turkey might sound a little extra at first glance, but it’s actually the smarter, simpler, faster way to get the holiday turkey of your dreams. Flavorful inside and out, crisped to perfection, and done in under two hours? That’s not just practical—it’s downright genius. Whether it’s Thanksgiving or just a cozy weekend feast, this method is a keeper. Oh, and don’t forget to check out our Leftover Turkey Soup or Turkey Dijon Melt Sandwiches to keep the goodness going after the main event.
Visit our Pinterest for regular slow cooker recipe updates, or join our Facebook discussions where cooking fans exchange their favorite hearty meal ideas.
PrintJuicy Dry Brined Spatchcock Turkey – Holiday Flavor, Half the Time

This spatchcock turkey recipe is the perfect way to cook a juicy, tender, flavorful turkey in a fraction of the time it usually takes. Dry brining ensures it’s seasoned inside and out, while roasting at high heat yields fantastically crisp skin. Holiday perfection!
- Prep Time: 20 minutes
- Cook Time: 1 hour 30 minutes
- Total Time: 9 hours 50 minutes
- Yield: 12 servings
- Category: Holidays
- Method: Roasting
- Cuisine: American
- Diet: Gluten Free
Ingredients
- 1 13 lb-16 lb whole turkey, giblet bag and neck removed
Citrus Dry Brine:
- 2 large oranges, finely zested
- 3 lemons, finely zested
- 2 limes, finely zested
- ⅓ cup kosher salt
- ¼ cup light brown sugar
- 1 tablespoon freshly cracked black pepper
Herb Butter:
- 8 tablespoons clarified butter or ghee
- 3 stems of fresh thyme leaves, finely chopped
- 2 stems of fresh rosemary leaves, finely chopped
- 4 sage leaves, finely chopped
Instructions
1. OPTIONAL: Using a sharp paring knife, locate and cut out the wishbone in the neck area of the turkey.
2. Flip the turkey breast-side down. Use sharp poultry shears to cut up each side of the spine and remove it. Save for stock.
3. Flip the turkey breast-side up and press down on the breastbone to flatten. Tuck thighs and legs over the top of the bird.
4. In a small bowl, mix orange, lemon, and lime zests with kosher salt, brown sugar, and black pepper.
5. Pat the turkey skin dry and rub the dry brine all over the skin and underside. Place on a wire rack on a baking sheet and refrigerate uncovered for at least 8 hours.
6. Melt the clarified butter and mix in the chopped thyme, rosemary, and sage. Set aside.
7. Preheat oven to 450°F (230°C). Remove turkey from fridge 30–60 minutes before roasting.
8. Blot skin dry again, then brush herb butter generously over the entire surface of the turkey.
9. Place turkey on wire rack and bake for 90–110 minutes, covering the breast with foil if browning too quickly.
10. Cook until a thermometer reads 165°F (74°C) in the thickest part of the thigh.
11. Remove from oven and rest for 40 minutes before carving and serving.
Notes
Do not use a turkey larger than 16 pounds—opt for two smaller birds if feeding a large crowd.
Avoid using the red “pop-up” thermometer. Always use a meat thermometer for accurate results.
Clarified butter adds great flavor, but high-smoke-point oils like avocado or grapeseed work too.
Save the neck, giblets, and spine to make stock or gravy.
Letting the turkey rest before carving ensures juicier meat.